Tag Archives: creative

Are You Ready To Start Expressing Yourself?

Standard
Are You Ready To Start Expressing Yourself?

One thing that a lot of people struggle with is that they don’t feel as though they’re able to project much about who they are to the world as a whole. You might be the most interesting, creative, and exciting person on the planet and yet you still feel as though you blend into the background when you’re around other people. Sure, not everyone wants to be the center of attention, but it can be tough when it feels like people aren’t getting to see the real you.

However, that doesn’t mean that you’re stuck with that kind of situation for the rest of your life! Being able to express yourself isn’t all that difficult, you just need to know how to go about it, and feel comfortable enough to let the real you shine through no matter what. Here are a few simple things that you can do to get started on really showing the world what you’re made of:

Change Up Your Look: Not everyone is going to be obsessed with fashion, and that’s okay! But the way that you present yourself can have a huge impact on the way the world sees you and can be a wonderful opportunity for you to express yourself. Different styles say different things, and it’s cool to be able to share something about yourself with everyone that you walk past. And of course, no one feels the same every day so why not change up your look constantly?!

Many people will look completely different on a day to day basis, whether that’s through clothes, makeup, or even wigs. That might sound a bit drastic but it can be a lot of fun, and it’s worth trying at least a couple of times. When it comes to wigs, try CelebWigs for a bunch of different styles to see how you can express yourself. Of course, if you’re not looking to make that much of an entrance wherever you go, sticking to a style that you love and reflects who you are is just as good!

express

Who doesn’t love a good makeover?!

Be Proud Of The Things You Love: We all have things that we’re passionate about, but a lot of the time we don’t want to express those things to other people because we’re worried about how they will judge them. This is where the idea of a “guilty pleasure” comes from. The truth, is that you should never have a guilty pleasure. If you love something, then that doesn’t impact anyone else’s life, so why shouldn’t you be proud of it? Whether it’s a type of music, TV, book, or anything else, wearing your passions on your sleeve can be a great way to express yourself to the world. And hey, you might even find that someone else feels the same way and you can strike up a new friendship.

Be Confident In Who You Are: One of the hardest things in the world is being confident in who you are. The media and the world around us work very hard to tell us that we’re not good enough. That we’re too fat, thin, short, tall, old, or young. All of these things mean that many of us are walking around on a day to day basis feeling as though we can’t be confident in who we are. But the world’s not going to change unless we change. So, no matter who you are, it’s important to be proud of it and never let the world tell you that there’s something wrong with that.

Change Your Environment: Of course, sometimes those kinds of feelings don’t come from inside yourself but from a toxic environment. Having friends who don’t appreciate who you are or people around you who try to make you feel bad for the way that you express yourself can make life very difficult and lonely for a lot of people. If that’s the case, then there’s nothing wrong with ending those friendships and changing your environment to something more loving and supportive. You would be amazed what a change of scenery can do for your self love and confidence.

Now, none of this is trying to tell you that you should try and be some kind of bold, brash person if that’s not who you are deep down. You should never try to be anyone else. The point is simply to be able to embrace what makes you a unique individual and to avoid hiding that from the world, because everyone deserves to see the real you shine.

Featured Image By: Pexels

Great Ways To De-Stress

Standard
Great Ways To De-Stress

There are plenty of ways to relax. You can read a book, have a long bath, or watch your favorite movie with a takeout dinner. But what about those days when you can’t relax? You need to let off some steam after a hard day, and these things all seem too passive? You’re much too agitated to sit still. You need to de-stress and unwind before you are ready to chill out.

Well, fortunately, you don’t need to be stuck thinking about your day, winding yourself up more and more until you can’t sleep. With the right techniques, you can get yourself perfectly zen before hitting the sack. Here are some of the best ways to de-stress after a hard day:

Do Something Creative: Using your energy for something creative is a great way to burn it off, and you may even create something amazing. Draw, paint, or play an instrument. Even if you’re not creatively talented, you can always try something new and find that you really enjoy it – even if you’re not the best. You don’t need to be good at an instrument to have fun trying, check out kindsound.com for some ideas. You also don’t need to be a great artist to make a picture. Adult coloring means that anyone can spend time using creative energies. Have a look at justcolor.net for some great printables.

destress

So fun!

Go For A Run: Running is a brilliant way to de-stress. You don’t need to go anywhere special or invest in expensive equipment. You just need some cheap trainers to get started. Run straight out of your front door, focusing on the rhythm of your feet hitting the ground and feel your stress leaving your body. Run until you feel better or you can’t run anymore. Then, turn around and go home. You’ll feel more relaxed and confident, and you’ll get a fantastic night’s sleep.

destress1

Pixabay Image

Do A Fitness Video: If you don’t fancy running, try an online fitness video, instead. There are plenty available on YouTube, but try something new like combat aerobics or boxercise to burn away some of that stress efficiently. Literally, punch it out of your body.

Have A Massage: Getting a massage is probably the most passive way to release your stress. You don’t have to do anything but lie there while someone else pounds the stress from your muscles, getting rid of your knots and helping to remove the tension from your body. Often after a good massage, people feel like a weight has been lifted from their shoulders. Swedish massages tend to be a very popular option and might be just what you need to unwind. If you are interested in learning more before you book an appointment, simply enter a search for “swedish massage in Missouri City, TX” (or your local area) to find the best massage therapists near you.

Massages are great for providing short term relief for stress. However, they are not going to be a cure for consistent pain, tension, or nerve issues. If this is something you are struggling with, it’s important to speak with your doctor. They might recommend physical therapy or perhaps Rolfing Structural Integration which is a combination of manual and movement therapy. Once your pain has improved, you will surely find that your stress levels will lower too.

Shout: If all else fails, scream and shout and let it all out! #britneyspears #will.i.am Sometimes there’s no better way to release everything than to scream. Go down to the bottom of your garden and scream your heart out. You might find that you feel much better afterward and who cares if you freak out the neighbors!

destress2

Ahhhhh!

Finding a way to let your feelings out can calm you down enough that you can enjoy the rest of your evening and get a great night’s sleep. If you can let these negative energies out productively and safely, then treat yourself, you deserve it.

Featured Image By: Her Campus

Spur Your Creativity With A Photography Hobby: Here’s How

Standard
Spur Your Creativity With A Photography Hobby: Here’s How

In an effort to become a more wholesome and interesting person in the world around you, it’s likely that you’ll find the need to be creative as high on the list of new things to try. One of the most popular and easy to begin methods of doing so is to pick up a photography hobby. This is a discipline that is totally easy to begin, but incredibly difficult to master. What’s more is that because the art is so subjective in terms of what makes a good photograph, that learning more can be difficult and frustrating. But much like creative disciplines, such as writing, there is a “good” and a “bad” way to go about your practice. If you wish to write but can’t write in a way in which the people around you can interpret it, your years as a professional writer are likely numbered, if not nonexistent.

Luckily, there does exist solid methods for overcoming these difficulties relating to photography. Remember, beginning a creative discipline never demands that you are a master of the art. It simply demands that you try, keep pushing your comfort zone, and also attempt things that help you feel happy and sustained within the hobby. Because if you can’t do that, then why bother picking it up in the first place? The following tips will help you continue your newly found passion with a sense of interest and progression:

Anyone Can Start: Many people think that in order to begin photography you need to make a huge financial investment in the equipment. This is simply not true. Smartphones these days often have cameras capable of taking pictures in 4K and also come loaded with compositional lenses built into the software of the camera.

Of course, this is no substitute to a quality SLR camera with actual lenses, but it can help you start and get an idea for framing well. Taking pictures, no matter the device which is used is more of a matter of personal taste and ambition than what lenses you use. The effect is all that matters. It’s unlikely that while attending a photography gallery you’ll hear people complimenting the use of lenses. It’s usually the achieved effect which is the most important, so don’t feel stifled by a lack of equipment just yet, especially in the early days.

Study Skilled Photographers: Skilled photographers are a dime a dozen, so it’s worth looking at people who have managed to make it their career or working passion. For example, artists such as Peter Lik have crafted an interesting niche for themselves by taking stunning landscape photography, selling his work for millions. It’s important to understand just how great and motivational this can be. You should never be in photography for the profit motive, as you’re likely to be disappointed until you can truly call yourself a master of the craft. However, seeing the best examples around can help you feel inspired to truly dare to take the best shots awaiting you. See your life through the lens as these folks do, and you may even train your eye to take in the world around you much more perceptively.

A budding photographer worthy of fame and recognition may wait inside of you. But you’ll only know if you’re willing to practice and fail. Good luck!

Featured Image By: Pexels

Falling For Autumn Nail Art

Standard
Falling For Autumn Nail Art

Hello everyone and happy Sunday!! As all of you know, Lil Red loves pretty nails, but is far from adequate at doing them on my own. While I opt for my talon style acrylic nails, there are ladies like the lovely Sandra from Finger Candy who can create gorgeously designed nails at ease. Sandra was kind enough to create three different tutorials on how to DIY beautiful autumn themed nails and I am so excited to share them with you on my page. Take a look:

Falling For Autumn Nail Art

Hello there, friends! Coming at you today from the brave new world of guest blogging, brave as in Sarah trusting me enough to write something for her that won’t embarrass us all? 😉 It’s really quite the exercise in trust, and I don’t intend to let Lil Red, kind hostess that she is, down…particularly since I have a mess of fun fall nail art to share with you, and I know you’re going to want to get in on that action. (You couldn’t embarrass me if you tried, darling! -Sarah)

“Woah, woah, woah,” you may be saying to yourself. “Nail art? Like, dangling pendants and jewels and stuff?” Well, sometimes – nail art is nothing if not deeply excessive. One of its many charms (ba dum chhhhhh)! But nail art can also be simple, and often all the more stunning for it. It’s just a nice little bonus when a manicure doesn’t take two hours and twenty different tools.

The following three tutorials cover a trio of easy nail art looks that are perfect for the upcoming fall season – dotted, multi-color leaves, a sponged-on blanket of leaves carpeting the forest floor, even a bit of that cold November Rain that the forecasters are always wailing on about.

“But that looks like so many polishes!” you also may be thinking to yourself (My, aren’t we chatty today?). True, eleven polishes across three manicures does seem like a lot, but they’re all fairly basic colors and finishes, and readily available at your local drugstore or beauty supply shop – no hard-to-find and/or expensive indies on this list. So feel free to deviate from the specific polishes that I’ve shown here (Which you’ll find at the bottom of this post.). In fact, I’d prefer it if you did, as some of these polishes have seen better days and may no longer be in production. So grab any old red, green, or yellow that you already have on hand, and don’t feel wedded to my choices; there’s no wrong answers here.

Having said all that, you will need a fine detail brush, a palette onto which to dab your polishes (I use the back of a plasticized DVD case, although the back of a plastic baggie also works very well.), a small-to-medium sized dotting tool, and three cosmetic sponges. Those points are non-negotiable, I’m afraid. 🙂

Tutorial - Tools Collage

Marbled Leaves Nail Art Tutorial

Tutorial - Dotted Leaves

These fun dotted nails utilize a technique that I like to think I came up with myself where you blend two different polishes together and then dot them onto your nails to create a cool marbled look. It’s a neat trick that lends itself well to fall’s bounty of multi-colored foliage.

For this mani, you’ll need your dotting tool, a cream or nude-colored base, and polishes in red, orange, yellow, grass green, forest green, and glittery gold.

Step 1: Paint your nails to opacity with a cream, off-white, or nude polish. Let dry.

Step 2: Dab a small blob of red and then yellow polish out onto your palette. Dipping your dotting tool first into the red polish and then into the yellow (or vice versa, it doesn’t really matter), dot the mixture onto your nails, two or three dots per nail.

Step 3: Repeat with a mixture of the yellow and grass green polishes.

Step 4: Repeat again with a mixture of the orange and forest green polishes.

Step 5: And then repeat again with the red and orange polishes. A little overlap will occur – that’s okay! You want these little marbled dots to look like layered drifts of crunchy autumn leaves, so the dots are bound to touch.

Step 6: Repeat the dotting (Last time, I promise!) with a mixture of the forest green and yellow polishes. Then, dabbing a small blob of the glittery gold polish out onto your palette, dip your dotting tool into the polish and apply to any spots that need a bit of filling-in or brightening-up, three or four dots per nail. Once dry, top with a high gloss topcoat and you’re good to go.

November Rain Nail Art Tutorial

Tutorial - November Rain

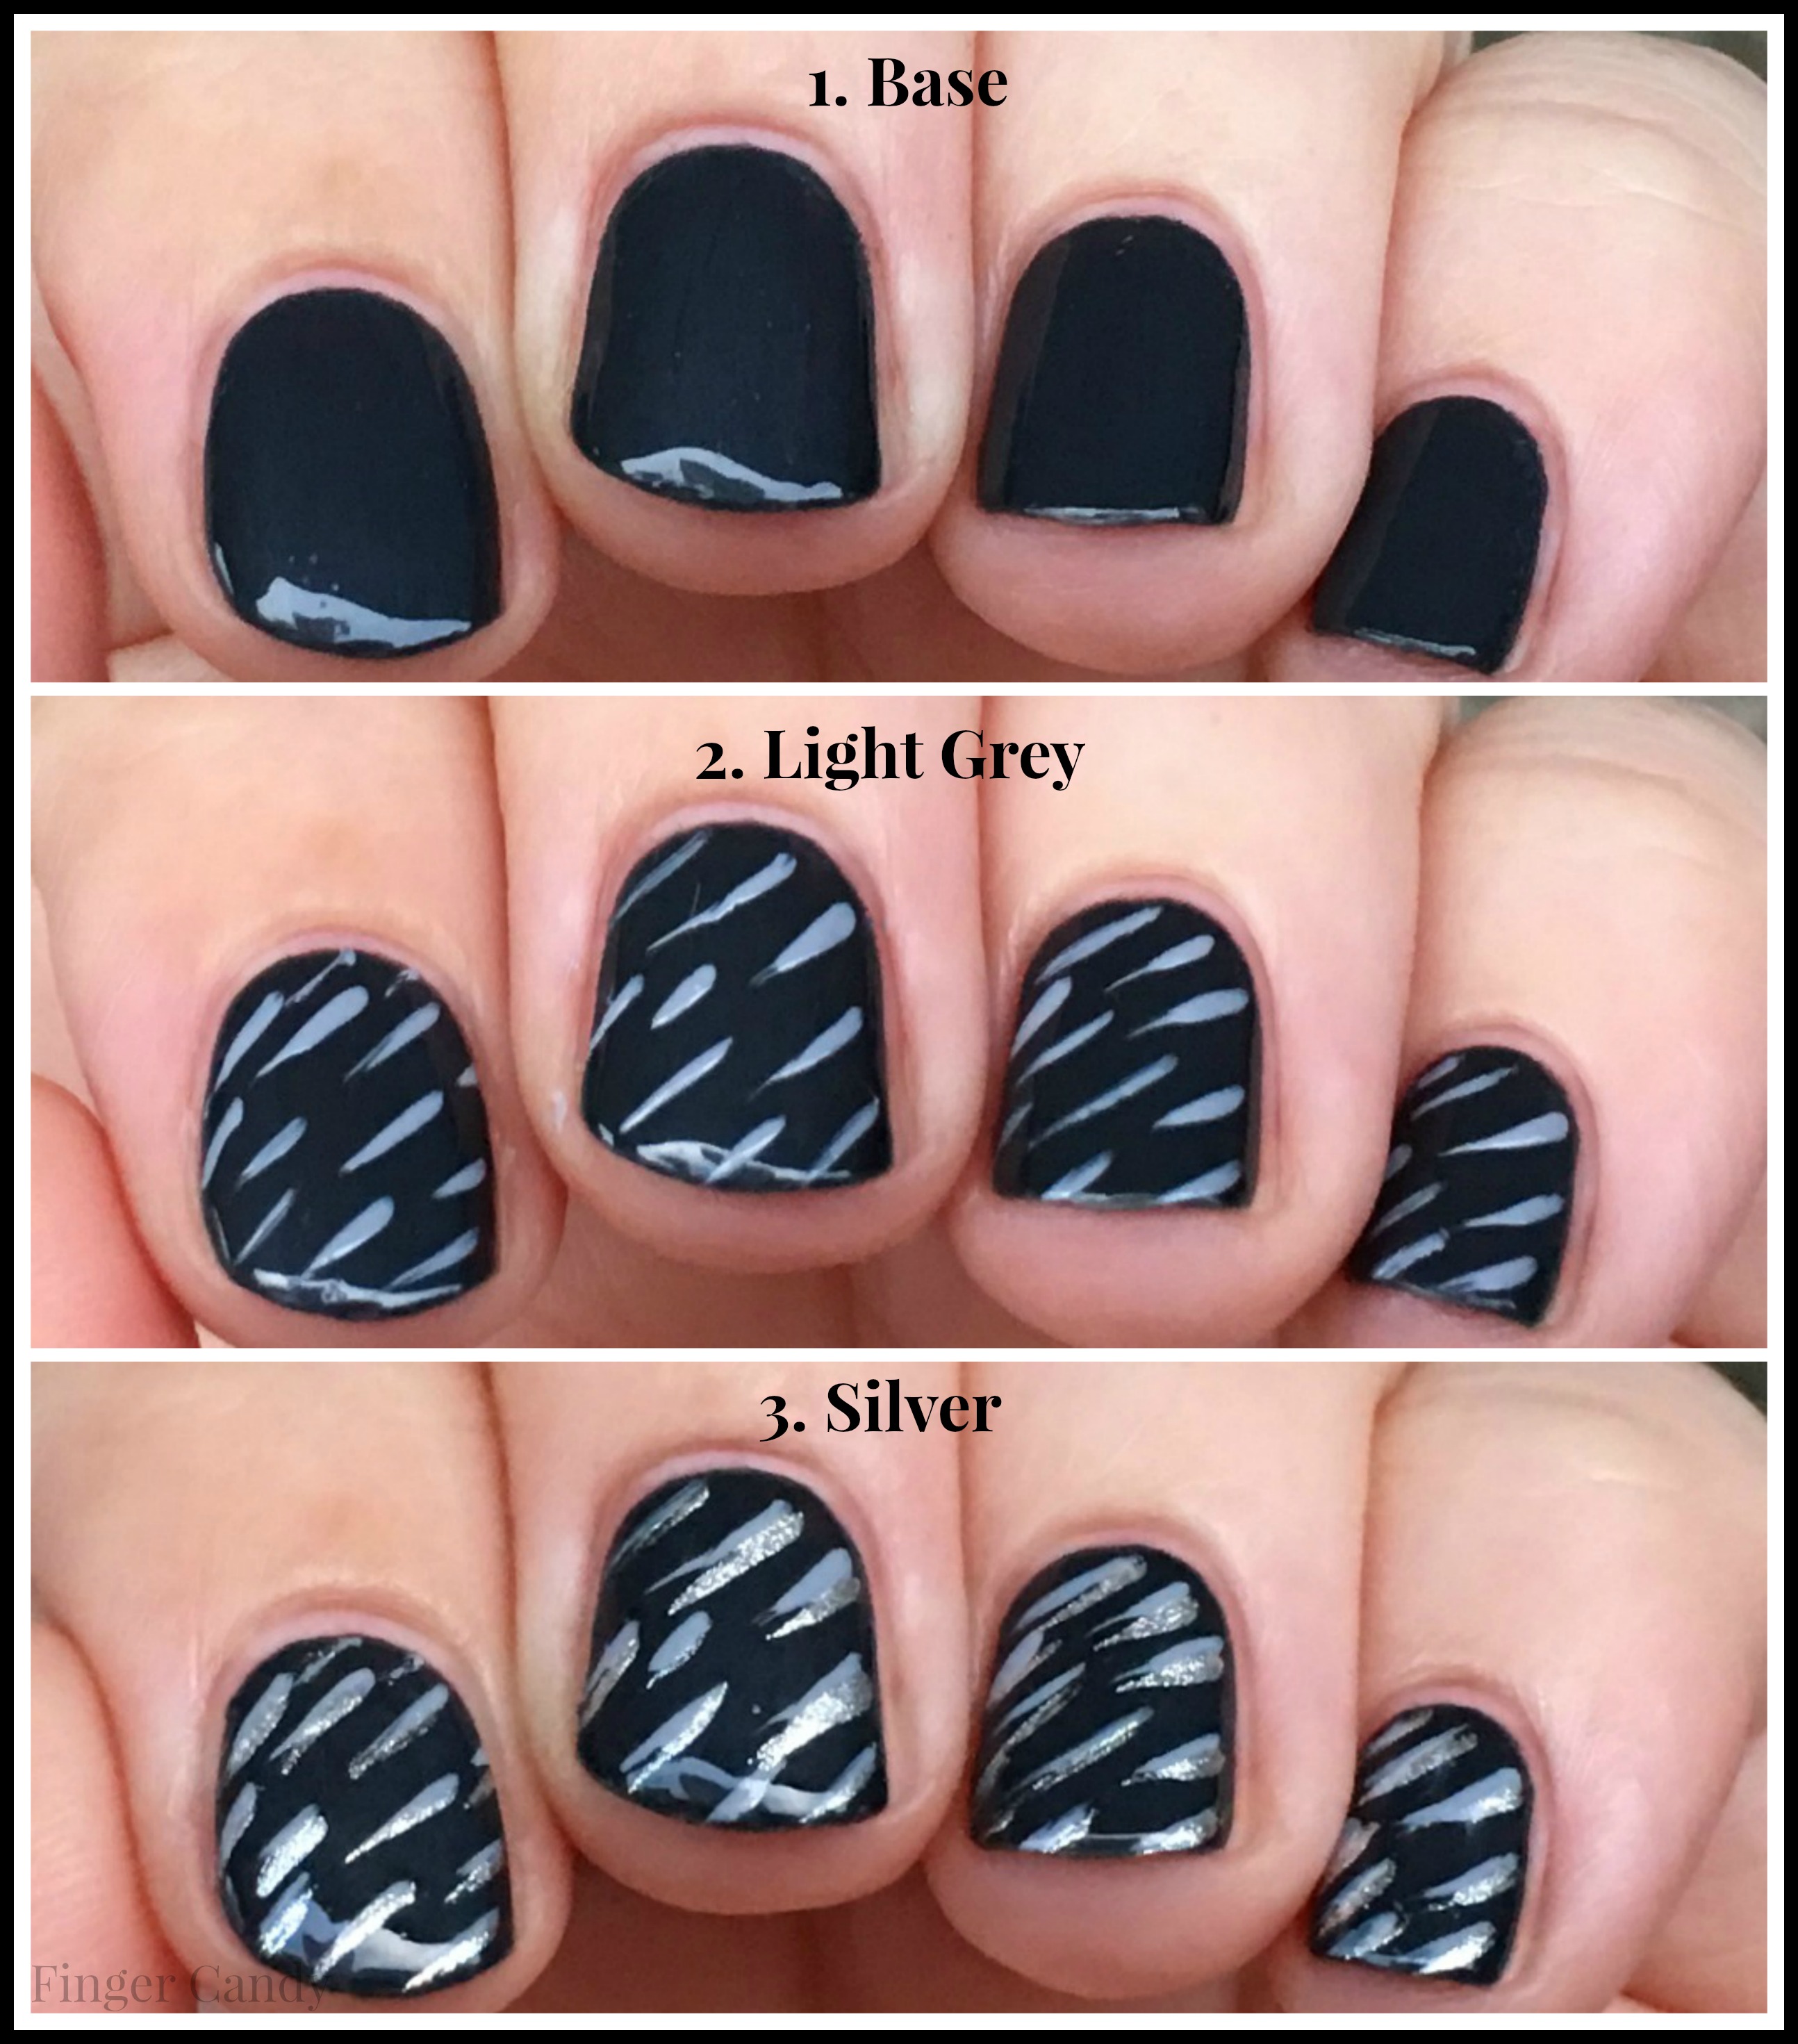
I can’t hear the words “November Rain” without wanting to immediately sprint into the desert in a lo-sho lace wedding gown and get hitched to some dude who looks better in floral spandex pants than I do. The ’90s were a confusing time, kids! But these striking nails are straightforward enough, and so very pretty.

For this manicure, you’ll need your detail brush, a black or very dark grey base, and polishes in light grey and shimmery silver.

Step 1: Paint your nails to opacity with the black or dark grey polish. Let dry.

Step 2: Dab a small dot of the light grey polish out onto your palette. Dip your detail brush into the polish. Holding the brush at a downward angle, swipe the polish onto your nails from the top right to the bottom left with a short flicking motion. It’s okay, even preferable, if the little slashes don’t look too “done” – you’re going for that sleeting rain kind of look, after all.

Step 3: Dab a small dot of the sliver polish out onto your palette. Then following the technique laid out in Step 2, add short, silver slashes to your nails just below the light grey slashes. You don’t want to cover the grey completely, merely enhance it. Once dry, top with a high gloss topcoat.

Forest Floor Nail Art Tutorial

Tutorial - Forest Floor

Finally, we have a fun, sponged-on manicure that mimics the kaleidoscope of rich autumn leaves that blanket a forest floor. Or your front lawn if you’re lucky enough to live in a lushly leafy climate like mine (Ontario, Canada, if you’re curious.). The other nice thing about these nails is, with the exception of the yellow and the addition of a medium brown, I used all of the same polishes as I did in the first manicure.

For this mani, you’ll need three cosmetic sponges, a cream or nude-colored base, and polishes in red, brown, grass green, orange, and forest green.

Step 1: Paint your nails to opacity with a cream, off-white, or nude polish. Let dry.

Step 2: Dab a small blob of brown polish out onto your palette. Taking one of your cosmetic sponges, dip it into the polish and dab it up and down a couple of times to remove any excess. Then, sponge the polish onto your nails, one little patch per nail (Or more if your nails are longer than mine, which would be pretty much everyone!) If the sponged-on bits look too light, that’s fine, you can always add more. But much like salting your food, you can’t remove too much, so sponge lightly to start, and then go over any bare spots again if you feel that it’s necessary.

Step 3: Repeat with the grass green polish.

Step 4: Repeat again with the red polish.

Step 5: And again with the forest green polish.

Step 6: And then one last time with the orange polish.

Step 7 (top photo): Dab a small dot of the glittery gold polish out onto your palette. Dip the last remaining clean side of one of your cosmetic sponges into the polish and lightly sponge all over your nails for that extra pretty fall twinkle. Let dry and then top with a high gloss topcoat.

So there we have her, friends, three cool, not-too-brutally-difficult nail art looks perfect for the upcoming fall season. If any of you try these manicures for yourself, I’d love to see your results! Finally, thanks to Sarah, Lil Red, for temporarily hosting Finger Candy in her little corner of the virtual sky; Tis a pleasure to be your neighbor. 🙂

************************************

Polishes Used:

  • Essie Cocoa Karma (brown) and Pretty Edgy (forest green)
  • KB Shimmer Chilly Pepper (red)
  • OPI My Vampire is Buff (cream) and My Signature is “DC” (shimmery silver)
  • Orly Bling (glittery gold)
  • Pure Ice Wild Thing (grass green) and Show Stopper (yellow)
  • Sally Hansen Insta-Dri Show Steel-er (light grey)
  • Wet n’ Wild Sunny Side Up (orange)
  • Zoya Genevieve (dark grey)

Weren’t those tutorials absolutely fabulous?! A million thanks, again, to Sandra of Finger Candy for sharing her nail art talent with lifewithlilred for my Falling For Fall guest bloggers series. What is your favorite Sandra original design? Are you going to try out any of these styles? I want to hear from all of you, so leave me a comment and let’s chat! Much love. -Sarah

Pinterest Inspired Fall DIY

Standard
Pinterest Inspired Fall DIY

Hello everyone and welcome to a super cool arts and crafts post made by the darling Sandra of Lifestyle.UA! I am really excited about this post because Sandra went through the trouble of making a video for my Falling For Fall series of how to create some gorgeous fall crafts, which has never been done on lifewithlilred before. Sandra will give you the step by steps on how to create a lovely candle and fall dream board for all of your DIY pleasure. Take a look:

Pinterest Inspired Fall DIY

Hello! Autumn is coming soon so it’s time to get ready. I have prepared two easy DIYs for all of you to decorate your homes with during the fall. My video will start with the Cinnamon Candle and then will move on to the Ombre To Do List Board. You will need the following materials listed below. Happy crafting!
What I used for the Cinnamon Candle: 
1. 3 candles
2. a pot
3. cinnamon
4. spices and dried flowers or fruits
What I used for the Ombre To Do List Board:
1. acrylic paint (white, red, orange)
2. a white board
3. hot glue
4. rope
5. a pen
And here is a step by step video of how to create them:

Have fun!
INSTAGRAM // @diy_lifestyle.ua and @sandrachery
Tumbr: Sandra Cherry “
Thank you so much again to Sandra for creating such fun crafts for my readers! How do you DIY in the fall? Are you crafty or craft store catastrophe? I want to hear from all of you, so leave me a comment and let’s chat! Much love. -Sarah

Basic Space: Creating Your Songwriting Haven

Standard
Basic Space: Creating Your Songwriting Haven

Do you remember the early days when you were locked away in your room learning the guitar or piano and finding out there is no such thing as B-sharp? It was your continual curiosity that piqued your interest in becoming a musician in the first place. And if you are moving on to that next stage where you are trying to create your own music and writing songs, it’s important to get back to that metaphorical head space where you were curious. But it’s also important to get a good physical space in which to create, so here are a few things to think about:

Learn From The Best: The greatest thing about being a songwriter is that you have thousands upon thousands of people to get inspiration from and you can spend countless hours learning from others. You could spend your time reading books and listening to other artists to help you keep fresh when you are in a creative lull. If you are ever feeling dry, it’s very likely because you’re not assimilating enough inspiration.

Create a Space Conducive to Songwriting: If you haven’t got somewhere that you can tune out the world, you’ll be lucky to get any semblance of songwriting completed. But it’s also vital for your practice that you have somewhere where you can be free to experiment in a place that’s your own, but also be surrounded by a constant source of inspiration.

A good place to start in your space is with the classic vinyl records that are clearly pointed out to be a superior listening experience (which we all know deep down). It’s important to be surrounded with the right materials. New Order’s recording studio had a poster on the wall with a lot of old film titles which ended up being the basis for a lot of their songs in the 80’s including Cries And Whispers. So if you have the right environment in which to create, with adequate inspiration from books to posters and, yes, records, it will start you off on the right foot.

Throw The Rule Book Away: Thom Yorke (by way of Tom Waits) said that it was the ignorance of certain instruments that made them more infinitely fascinating. Noel Gallagher has been using the same 4 chords for 20 odd years but is still able to make them sound like new. So sometimes it’s important to unlearn what you have learned to free you up. If you are bound by structure, it can be inhibiting in certain ways, which is why it’s important to be able to make mistakes and play a bum note because you are in the experimental stage.

People place a lot of pressure on getting things right the first time especially if you’re in a band, but even a band like Genesis (love them or hate them!) made the vast majority of their later songs out of studio. The musicians were freer with each other by this point to experiment. Your own worst critic will always be yourself and when it comes to songwriting and creating the right atmosphere in which to do it, it’s important to create this space inside of your mind as well as in a physical location.

Featured Image By: Pexels

Turn Your Love Of Crafts Into A Full Blown Business

Standard
Turn Your Love Of Crafts Into A Full Blown Business

Do you love trying your luck with some at home DIY? Perhaps you love sinking your teeth into a craft project and not stopping until you have a finished result that is both stunning and a major conversation starter. If that’s the case, it might be worth considering whether you can turn your love for crafts like sewing, knitting, or woodwork into a full blown career. If you love it that much, it’s never a bad idea to explore the possibility of basing your life and your earnings around it. Let’s explore how to get started with this idea:

Getting Set Up:

If you’re completing woodwork, at the very least, you’ll need a tuner and a few saws. You might also need a work table and, if you are operating in a small space, a piece of equipment to keep the air clean. Safety might also be a concern for this one, so make sure that you have goggles because if a wooden splinter gets in your eye… you’re going to cry. For some crafts, the set up is a tad simpler. If you are sewing clothing, for example, you just need something like an embroidery machine. You can get an affordable embroidery machine for your business on the market at a price that you should easily be able to fit into your budget. Once you have this, you can get started producing gorgeous products.

It is worth pointing out that at this stage, you should not be focused on making money. Instead, you should put all of your time and effort into producing items that are of high quality and will interest a few buyers. But quality should always be your top priority.

How To Sell:

Once you have a few products ready to sell, you should think about the source that you’re going to use to sell them. The easiest option here would be to set up a website. That way, you will be able to sell all of the products you want without any trouble at all. If you don’t want to invest a lot of money into this idea just yet, it’s worth just starting with a free blog using a basic template. As your business grows, you’re going to need to be a little more clever with marketing. But for the first few weeks, you’ll probably only be selling to family, friends, and acquaintances anyways.

Finding The Right Price:

When you start your business, it doesn’t matter what price you sell your products at. You don’t even have to make a profit, because it’s all about finding your footing on the market and gaining the interest from target customers. But eventually, you will need to focus on making money, and to do that you need to have the right price to make a profit. You will need to take into account production costs, the price of materials that you use, and deliveries. When all of this is taken into account, you might find you need to sell your items at a tad more than you expected.

If you use these steps, you will find yourself with the starting blocks to turn a passion for crafts into a money making career. Good luck, you beautiful, crafty genius!

Featured Image By: Pexels

Creative Summer Cooking Ideas That Are Simple And Scrumptious

Standard
Creative Summer Cooking Ideas That Are Simple And Scrumptious

As soon as the weather warms up and the days get brighter, we all want to change our eating habits. There’s just something about an increase in heat that makes you want to go for fresher, lighter, and less indulgent food choices. But, at the same time, you still want to be able to enjoy a delicious dinner that’s full of flavor. To find that perfect balance, you’re going to want to get your creative summer cook on.

So where should you start? When you’re busy, you definitely want your summer cooking ideas to be super easy to make. But at the same time, they have to taste good and look like a small slice of summer, too. To give you the ultimate inspiration for your light evening meals and tasty long lunches, here are a few ideas to get your taste buds tingling:

One-Tray Bakes: When you want something super easy, balanced, but incredibly tasty, always turn to a one-tray bake. During the summer months, you want to be outside with your family and not slaving over a hot oven, so the tray bake is perfect for that reason. By throwing all of your ingredients into one tray and baking it all at once, your meal is done. More often than not, you’ll have veggies in the mix, but you can also serve a salad on the side if you’re feeling saucy!

Summer Pasta: For something super filling but also light, you’re going to want to pull together the perfect summer pasta. Pasta is a great ingredient to play around with. Not only can you choose from a range of different styles, but you can mix up your sauces and ingredients to create completely different dishes. For summer, try using fresh shrimp and crunchy veggies to create healthy but delicious meals.

Low Carb Favorites: Sometimes you want a really light meal that is easy to snack on and won’t make you feel bloated in the heat (Which is the literal worst.). Summer is the perfect time to go for low-carb versions of your favorite dishes. Hello, beach body. Craving pizza? Build your ingredients on a tortilla base, instead. If you want fajitas, why not go for lettuce wraps? And if you want tacos (who doesn’t?), fill them with fresh fish and shredded salad for a lighter alternative.

Rainbow Salads: Then, we get to the salads, because a summer menu wouldn’t be complete without a bunch of them! Don’t think about the kind of diet food you’d usually expect, oh no – these salads should be big, bold, bright, and beautiful. Rainbow salads packed with exciting, crunchy, and flavorful veggies are the best. Create your own dressing and serve with a protein source for a colorful and complete meal.

food7

YUM

Smoked Meats: When you love meats, you want to make sure that they’re packed full of flavor and are served super succulent in the summer. There’s just something about a lighter version of the tastiest meats that screams summer. And when you want to go tender and melt-in-your-mouth, you smoke. You can read the pros and cons of the Brinkmann electric smoker to see if it’s a cooking method that you can work with. If so, throw in your meats and even a few veggies and prepare for a flavor overload.

Mixed Rice: Rice is a great grain that we don’t give enough credit to. It’s always tasty and it’s a super light carb source, too. As a part of your summer meal frenzy, try making a bunch of rice based meals. Stir in your favorite meats, serve with crunchy veggies, and dress with delicious sauces to create some of the most exciting dishes around.

Ultimate Burgers: Summertime is all about the burgers. When you love a good burger, you’ll take one all year round, but there’s nothing like a hot summer day with a burger in hand to make you feel happy (Any food in my hand makes me feel happy!). But don’t just stick to a standard beef patty – pimp them up! There are so many amazing burger recipes here, just take a look. If the chipotle turkey, chicken Caesar, or even the taco burger doesn’t tempt you, you’re not a true burger fan! And if you’re a vegetarian, like me, the veggie burger is a thing!! 😀

Asian Anything: If there’s one kind of cuisine that works the best with summer meals, it’s got to be Asian. Asian cooking is full of those incredibly fresh favors that just work so well when its warm. Whether you decide to whip up a noodle dish or create a crunchy salad, sticking to Asian ingredients and flavors will always serve you well in the summer months.

Garden parties, picnics, and BBQs are essential summer activities. Create the perfect menu with the above ideas, invite your friends, and have yourself a backyard bash!

Featured Image By: Pexels

Making Your Home Comfortable Doesn’t Need To Break The Bank!

Standard

When people think about a really comfortable home, they often assume that it’s the kind of thing that can only be achieved through spending large amounts of money. That to get the most comfortable, relaxing, luxurious atmosphere possible, you need to fork out the kind of cash that most of us would usually prefer to spend on things like food and paying off bills.

Of course, that’s completely ridiculous! In fact, the idea that you have to pay out the nose to do anything to your home is something that a lot of people really need to get past. Aside from big projects like extensions or knocking down walls, there are creative, thrifty, DIY solutions for pretty much anything in your home. So here are a few simple, easy, and cheap ways to make your home as comfortable as possible without breaking the bank:

Get Creative With Light: It’s strange that people tend to forget about the importance of lighting since the way that you light your home can make a lot of difference to the way that it feels overall. A poorly lit home can feel far smaller and more cramped than it really is whereas using too much cold light has a tendency to make things feel a little clinical and impersonal. Natural light is always your best bet for creating a warm, comfortable atmosphere but when the sun goes down why not think about things like trailing fairy lights along the walls or mixing and matching different lamps throughout a room? There’s no real limit to how creative you can get with light so just experiment and see what works for you.

comfort

Love fairy lights!

Beat The Heat With A Portable A/C: There’s nothing worse that being unable to stay cool on a really hot day. A lot of the time the solution is to simply get outside in the fresh air and find some shade, but sometimes you’re either stuck in the house, or it’s simply too hot to expose yourself to the sunshine. When that happens, it’s important to try and keep the temperature in your home as low as possible. Things like fans are good but they often just move the air around. A portable A/C is a great, affordable way of making a room instantly more comfortable. There are plenty of portable A/C units for pretty much any budget that you can find at CoolAndPortable.com. This isn’t something that you’ll want to use all of the time, but you’ll be grateful for it when you’re stuck at home, sweating like a pig!

There’s No Such Thing As Too Many Cushions: Seriously. This one pretty much explains itself! People might try to tell you that there is such a thing as too many cushions, but they’re wrong, and they don’t know what they’re talking about. Cushions can turn even the plainest room into somewhere pleasant and cozy. They can make sofas and beds more luxurious and they can make even the hardest chairs more comfortable. Seriously, just get cushions, as many as you can. You’ll never have enough. Ever.

comfort1

SO. Comfy!!

Use Your Other Senses, Too: When people talk about improving your home they almost always just talk about them in terms of one sense: sight. But, it’s important to remember that you experience your home with more than just that one sense. Your sense of smell is a major factor in how it feels to enter any room. Why not get some nice smells floating around the house? Of course, the best way to do that is with some plants and flowers, but there are plenty of scented plugins that can make your home smell fresh and inviting. Switch it up every so often, too, because it’s incredibly easy to end up getting so used to a particular smell that you simply fail to notice it anymore. By changing it up every now and then, you’ll be able to step into your home and be greeted by a pleasant fresh scent every time.

There are dozens, maybe even hundreds, of different ways to make your home feel more comfortable, inviting, and luxurious but hopefully this list has shown that it’s possible to create the kind of home that you’ll never want to leave without having to empty your savings account. Of course, if you want to do something a little more drastic then you’re probably going to have to pay for it, but it’s important to know that there are other options available to you for a quick but effective spruce up of your home!

Kitchen Ideas From Professional Interior Designers

Standard
Kitchen Ideas From Professional Interior Designers

You will find that your kitchen can quickly become tired and look dated, which can require a few little updates and tweaks every couple of years. There’s no need to do in depth remodeling every time, but still, a little bit of design and decor work will really go a long way! But with all of this continuous work, you could end up running out of creative ideas for your kitchen. Where do you turn once your inspiration dries up and you just can’t think of how to update the room?

You need to turn to the professionals, of course! Interior designers specializing in kitchen remodeling are constantly working on new kitchens and will definitely be brimming with some fantastic ideas. In fact, here are some amazing ideas that have come straight from professional interior designers themselves:

Update Worktops: One area of your kitchen that will need to be regularly updated is the countertops. That’s because these are often exposed to raw meats and other food products that could easily spread bacteria. If your worktops or counter tops ever get damaged and chipped, they could become breeding grounds for germs and bacteria so it could be necessary to replace them. But, many interior designers believe that you should regularly update yours for style purposes. New materials are constantly coming in and out of fashion, so switching the ones in your worktops could make all of the difference to your kitchen’s overall style!

Consider Getting An Island: If you have the space in your kitchen, you should really think about getting an island right in the middle. This is a lot more fashionable than having a dining room table in your kitchen. Islands can double up as a workstation as well as an area for eating. But an island can also add some definite walkways to your kitchen, which can help with the overall decor flow.

Be Clever With Light: I doubt just having one central light bulb hanging down from the ceiling is going to be enough light for your kitchen. So, you should think about adding additional lighting options. If you have some cupboards at head height, it’s a nice idea to add some lights underneath, especially if they are above a worktop. You might also want to use some very stylish lamps, which can add another element of elegance to your kitchen.

prof1

Love that table set!

Plan Your Power: You will no doubt have lots of different appliances and tools in your kitchen that will need electricity to work. If you don’t have enough power points, there will be no way that these will be able to do their job! So next time you come to decorate or work on your kitchen, it is a good idea to review all the power points in your kitchen and see if you have enough for your needs. If you want a few extra ones added, you can always call up your local electrician to come and install some for you.

Featured Image By: Pixabay