Author Archives: lifewithlilred

Unknown's avatar

About lifewithlilred

Just your average gal blogging an average blog!

A New Day, A New Jacket

Standard
A New Day, A New Jacket

Hi everyone and happy Thursday! Boy, does it feel great to be back on lifewithlilred after my vacation in Asheville, North Carolina. Thanks again to all of my fabulous Falling For Fall guest bloggers for holding it down while I was away! ❤

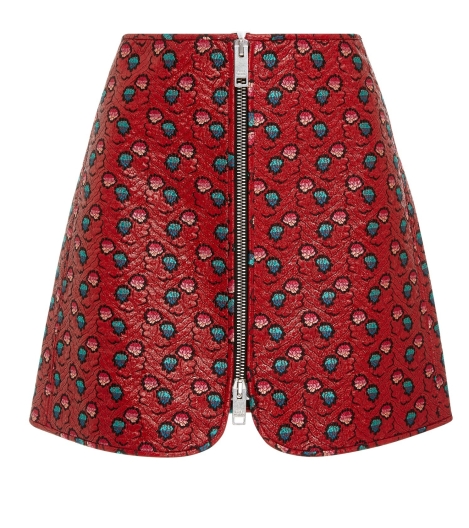
The fall is a very dark time for me. With all of the gorgeous cool weather clothing, shoes, and accessories that the stores have to offer, I turn into a woman possessed. I forget my name, where I am, and the fact that I don’t need any more clothes and go credit card crazy. I JUST CAN’T HELP MYSELF. If you guys pay an ounce of attention to my page, you’ll know that cool weather clothing makes up a solid ninety percent of my wardrobe. I love it all. Ahem:

  • Peacoats
  • Flannels
  • Sweaters
  • Skinny jeans
  • Thick tights
  • Moto jackets
  • Trench coats
  • Knee high boots
  • Thigh high boots
  • Ankle booties
  • Combat boots
  • Hats
  • Gloves
  • Scarves
  • Layering ALL THE THINGS
  • Sadly, the list goes on.

With this list in mind, it’s easy to see how I lose my bearings literally EVERY TIME I step foot in a store that sells clothing. It’s my cross to bear, I suppose, but hey – it could be worse!

The splendor of fall clothing, aside from the gorgeous jewel tone hues, is that if you style it properly, you can get away with wearing some of the pieces year round. Fall clothing gives you options. To me, there is nothing better than buying something that I can get away with wearing during most weather conditions (with the exception of heavier coats and sweaters). I always consider the Cost Per Wear (CPW) with everything that I buy, and year round appropriate clothing dwindles the CPW down significantly. You guys know by now that I try to get the most bang for my buck, which is why my wardrobe gravitates so heavily towards all autumn everything.

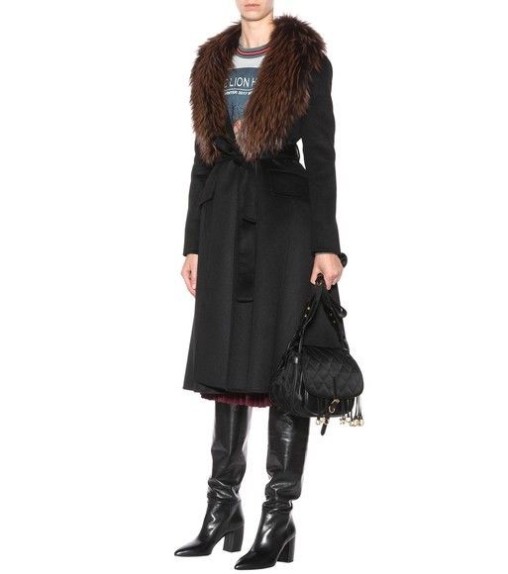
Blah, blah, blah – Just get to what you bought already, right? Sigh. Okay. Enough trying to justify my spending. I dug my grave and now I must lie in it, but first, let me show you my new jacket from Target’s brand, A New Day:

anewdayanewday1

Have you ever had a spiritual connection with a piece of clothing? You know, that feeling of “I could buy this right now and not even bother trying it on”?  I had that feeling when my eyes landed on this magnificent knee length A New Day coat. And, I have to tell you guys, I was nervous. To me, this jacket looks expensive as far as Target goes. Come winter, their coats can reach up to eighty dollars. And, despite my love for this beauty, I would not be comfortable spending that much for it. So, imagine my relief when I took a peek at the price tag and saw that it was half of that – forty bucks. Yeah, I can swing that.

The jewel tones, the length, the possibility for layering, and the warmth level between light and medium, ON TOP of a forty dollar price tag made this jacket such a steal. Frankly, I couldn’t believe it, because it really just seemed too good to be true. But the heart wants what the heart wants, and that purchase price sealed the deal. I ripped my moto jacket off, set my purse on the ground, and got the coat on all in under five seconds. It then took a literal glance of myself in the mirror to verify that this jacket was mine.

I absolutely LOVE the colors of this coat. The deep navy, violet, and mustard yellow are all shades that look stunning against my red hair and pasty pale skin. It makes everything that makes me, me pop. But what really got me about this A New Day piece is the shape of it. It has that shabby chic college professor vibe to it and I just love that. It’s just the smallest pinch oversized which gives the coat such gorgeous movement as well as the option to layer a thick sweater underneath it during the winter.

And, finally, this jacket will last me from the beginning of fall until it warms up in the spring because of its relative lightness. This piece is perfect. It’s the epitome of what fall clothing is all about and why I love dressing for the season so much. And also why I basically wrote a love letter to my new jacket in this post.

A New Day provided me with A New Jacket and I can’t thank the brand enough for it! I never knew what true love was until now and whatever. What do you love about fall clothing? How would you style this coat? I want to hear from all of you, so leave me a comment and let’s chat! Much love. -Sarah

Getting Strong Quickly (Without The Bulk)

Standard
Getting Strong Quickly (Without The Bulk)

It’s the most common question people ask in relation to exercise, can you get fit or ripped in a short period of time? The short answer is no, but the way to build strength is something that can be done in a short period of time. It just requires a suitable exercise regime, as well as understanding the best approaches to exercise. A lot of women like to get stronger, but think that in order to do this, they would have to bulk up to the size of a small house, but this isn’t true at all. And here is how you can do it:

Lift Heavier Weights: We all tend to think that light dumbbells will do the job but, unfortunately, the only way to gain strength is to lift heavier weights. It’s going to be tiring to lift up to double your body weight so, instead of struggling, start off with body weight exercises. Strength training is going to look different for everyone and that is why it is best to research Effective strength training equipment for all levels. Using equipment that is outside of your current level can be dangerous and cause more harm to your body than good. Remember that the name of the game is starting out small and working yourself up and that is okay!

Fuel Your Body: You wouldn’t put the wrong fuel in your car, so why would you fill your body with the wrong nutrients? The fact is, that strength and power are all made with an excellent diet rich in the key nutrients, such as magnesium, calcium, and protein. If you are serious about embarking on an exercise regime that is going to help improve your strength, you need to make sure that you have the best nutrients in your body. Putting yourself under sudden physical pressure like lifting weights can be a strain to begin with, especially if you are weak in your bones. However, resistance training has been shown to increase bone density, but it’s always worth supplementing yourself with the right nutrients to increase your bone strength and overall physical strength. There are supplements like AlgaeCal that are good for overall bone health, but some people are concerned with the side effects of supplements, especially if you haven’t taken them before. You can look up the AlgaeCal side effects online and make a decision for yourself, but if you aren’t fueling yourself with the adequate diet, then you need to have supplements, as well, to make sure that you are recovering properly.

strong1

 Yummmm

Rest And Recovery: A common problem that people have when it comes to starting an exercise routine is that they go 9000% and burn out quickly. People will work out every morning, afternoon, and night, and this will only make you weaker over time, so make sure that you get enough sleep and take days off. When you rest, it gives your muscles time to recover and to rebuild, so, therefore, you rebuild strength.

It is possible to gain strength without gaining size, but the important thing is to lift heavy weights for a short period of time. This is where a move like a deadlift or power clean (shown in the Featured Image picture) will come in handy, because it’s an explosive move where you have to generate the most amount of strength in your body for the shortest period of time, and this is the key to gaining strength. Combining this with a great diet and additional supplements is the best way to get strong quickly. Hello, beach bod!

Featured Image By: Pixabay

Falling For Fall Guest Bloggers Series Conclusion

Standard
Falling For Fall Guest Bloggers Series Conclusion

Hello everyone and happy Hump Day! I’m here today to bring my Falling For Fall guest bloggers series to a close. I want to thank all of my amazing guest bloggers for making this season’s series such a success. All of you are welcome back on lifewithlilred anytime if you would like to pen another post for my readers or do a collaboration. I had so much fun chatting with all of you and it was such a pleasure to work with each of you. 🙂

I hope that all of my readers enjoyed my Falling For Fall series as much as I did working on it. See you next season change for a celebration of all things winter wonderland here on lifewithlilred!

What was your favorite post from this series? Who is going to join me as a guest blogger come wintertime? I want to hear from all of you, so leave me a comment and let’s chat! Much love. -Sarah

Forest Green Fabulous OOTD

Standard
Forest Green Fabulous OOTD

Hellooo everyone and welcome to the final post in my Falling For Fall guest bloggers series, brought to you by Nida of Shopaholic Blogs. I am so excited to welcome Nida back into the blogging world after a brief hiatus here on my page because she is just my absolute favorite! I missed her terribly in the blogosphere and I know that all of you did, too, so let’s take a look at the gorgeous fall OOTD that she created for us all the way from the UAE:

Forest Green Fabulous OOTD

Hello Bloggers! 💕

Welcome to a fabulous fall guest bloggers series courtesy of who else but my blogging BFF, Sarah, the lovely lady with a love for all things red️! (I LOVE YOU! -Sarah)

I have been totally absent from blogging for quite a while now owing to a multitude of reasons, which I will address in detail in a post coming soon. Till then, let’s focus on today’s blog post which is about all things fall, which sadly doesn’t apply here in UAE because we have an abundance of summer ️year round. ☀ So when Sarah asked me to be a part of her fall guest bloggers series, I was left scratching my head because temperatures here were at boiling point!🌡
Nevertheless, I am not one to let down a friend, so I picked a day when the heat was not as deadly as usual and tried my hand at creating a Fall Look in the desert for you guys.🌵 I worked really hard to fake a breezy fall look, so I hope that all of you enjoy it! Much love to Sarah, as always! 💕
Here’s presenting a how to fake fall in the summer️ without melting OOTD: 😂
nidafnidaf2nidaf3

Outfit Details:

🍁 Dress: Loft petites – I adore this Grecian style dress. The pleating at the waist is so figure flattering and the color is spot on for fall.
🍁 Scarf: Zeen – This is a Pakistani brand that does gorgeous scarves at a budget friendly price. I love the color combo on this scarf and it doesn’t hurt that it matches my lippie perfectly! 😘
🍁 Shoes: Charles & Keith – I love the pompom detailing on these sandals, which are right on trend for summer and fall.
🍁 Accessories: Pottery Barn – I know the pumpkins were a little cheesy, but hey! A little improvisation just adds to the look don’t you think? 🎃
🍁 Don’t forget to show me and Sarah some love️ by liking this post and commenting down below! 😘
Okay, so all of Nida’s pictures are always beautiful but how freaking cute is that last pic with the pumpkin?! Just dying!! Thank you so much again to my Shopaholic Blogs babe for concluding my Falling For Fall guest bloggers series with a bang! Tune in tomorrow as I wrap things up and show some love to all of my amazing guest bloggers who helped make this fall celebration so special.
Does your location have all four seasons? How do you style a warmer weather fall look? I want to hear from all of you, so leave me a comment and let’s chat! Much love. -Sarah

Spur Your Creativity With A Photography Hobby: Here’s How

Standard
Spur Your Creativity With A Photography Hobby: Here’s How

In an effort to become a more wholesome and interesting person in the world around you, it’s likely that you’ll find the need to be creative as high on the list of new things to try. One of the most popular and easy to begin methods of doing so is to pick up a photography hobby. This is a discipline that is totally easy to begin, but incredibly difficult to master. What’s more is that because the art is so subjective in terms of what makes a good photograph, that learning more can be difficult and frustrating. But much like creative disciplines, such as writing, there is a “good” and a “bad” way to go about your practice. If you wish to write but can’t write in a way in which the people around you can interpret it, your years as a professional writer are likely numbered, if not nonexistent.

Luckily, there does exist solid methods for overcoming these difficulties relating to photography. Remember, beginning a creative discipline never demands that you are a master of the art. It simply demands that you try, keep pushing your comfort zone, and also attempt things that help you feel happy and sustained within the hobby. Because if you can’t do that, then why bother picking it up in the first place? The following tips will help you continue your newly found passion with a sense of interest and progression:

Anyone Can Start: Many people think that in order to begin photography you need to make a huge financial investment in the equipment. This is simply not true. Smartphones these days often have cameras capable of taking pictures in 4K and also come loaded with compositional lenses built into the software of the camera.

Of course, this is no substitute to a quality SLR camera with actual lenses, but it can help you start and get an idea for framing well. Taking pictures, no matter the device which is used is more of a matter of personal taste and ambition than what lenses you use. The effect is all that matters. It’s unlikely that while attending a photography gallery you’ll hear people complimenting the use of lenses. It’s usually the achieved effect which is the most important, so don’t feel stifled by a lack of equipment just yet, especially in the early days.

Study Skilled Photographers: Skilled photographers are a dime a dozen, so it’s worth looking at people who have managed to make it their career or working passion. For example, artists such as Peter Lik have crafted an interesting niche for themselves by taking stunning landscape photography, selling his work for millions. It’s important to understand just how great and motivational this can be. You should never be in photography for the profit motive, as you’re likely to be disappointed until you can truly call yourself a master of the craft. However, seeing the best examples around can help you feel inspired to truly dare to take the best shots awaiting you. See your life through the lens as these folks do, and you may even train your eye to take in the world around you much more perceptively.

A budding photographer worthy of fame and recognition may wait inside of you. But you’ll only know if you’re willing to practice and fail. Good luck!

Featured Image By: Pexels

Cinnamon Hot Chocolate Recipe

Standard
Cinnamon Hot Chocolate Recipe

Hi everyone and happy Monday! Today’s post for my Falling For Fall guest bloggers series is a delicious Cinnamon Hot Chocolate Recipe by the darling Elle from Make It Blaine. Please be sure to check out her page and give it all the lovin! A huge steaming mug of hot chocolate is a fall favorite for many so let’s get to Elle’s recipe so that you can make some of your own the next time you get the autumn evening chills:

Cinnamon Hot Chocolate Recipe

  • 1 cup milk
  • 1 tablespoon cocoa powder (or however much you want)
  • 2-3 cinnamon sticks or cinnamon bark
  • whipped cream (optional)

First, pour your milk into a pot to heat on the stove and stir on low heat for 2-3 minutes. Stir in your cocoa powder until it’s completely dissolved. Next, pop in your cinnamon sticks and let the mixture simmer for 5-7 minutes. Take out the cinnamon sticks and pour into a mug (A cute one, if possible!).

Now it’s time for toppings! I personally like whipped cream with cocoa powder or cinnamon sprinkled on top but you can add whatever you want. I also like to make my own whipped cream by whisking whipping cream because then it doesn’t melt and tastes way better! Adorable mugs in autumnal colors doesn’t hurt and, last but not least, a straw to sip through.

FullSizeRender.jpg

I hope you enjoyed reading!

-Elle xoxo

Thank you so much to Elle for teaching us her favorite fall hot chocolate recipe! Freaking yummm. What is your favorite fall beverage? What is your favorite fall flavor? I want to hear from all of you, so leave me a comment and let’s chat! Much love. -Sarah

Safeguarding Your Dog’s Health

Standard
Safeguarding Your Dog’s Health

Looking after a dog is no easy task. Even if you’ve nailed the art of showing them love and affection, given that this part always comes naturally to dog lovers and owners, there’s still the practical aspect of looking after your dog to consider. Through no intentional fault, many dog owners make mistakes when it comes to looking after their fluffy little companion and might be neglecting certain aspects of their dog’s health that will cause problems for their best friend in later life. If you don’t want to see your woofing buddy fall ill or generally suffer from poor health, then here are some tips to help stop that from happening in the first place:

Food: Dogs are just like us. That’ll be the general theme of this article and it’s true in many ways. When it comes to health, the same things that keeps our bodies in good shape are SAMESIES for dogs. One of the most important aspects of your dog’s lifestyle is the food that he or she eats. You should be feeding them a consistent diet and keeping most human foods well away from them; chocolate is a definite no-no! Healthy, natural, and organic foods are always the best way to go with dogs. You might want to check out some homemade dog foods that we’ve talked about before if you’re thinking about switching pet foods.

Disease: Dogs experience diseases, infections, colds, and other forms of sickness just like humans, but they’re definitely more prone to them than us; they don’t live a hygienic life, even if you brush their teeth and bathe them. They’re animals that are born to be wild. You might want to look into flea and tick medication from companies such as Pet Action so that you always have some on hand for the likely event that your dog gets them. Dogs are always running into problems like this because of their lifestyle spent jumping around in the garden and getting muddy on long dog walks.

It’s very important that you don’t overlook any warning signs such as itching or a general decline in their mood. These signs can all be indicative of an underlying problem, and it will usually be something like fleas or ticks. Of course, if you’ve tried all that you can to help your dog when they’re unwell and they still seem “off”, then you might have to accept that your diagnosis is wrong and head off to the vet to find out what’s actually going on with your pet.

If you notice that you dog is limping or has a specific area of discomfort, get to the vet immediately. The longer this goes on, the more serious and painful for your pet it could become. Should this problem be a fracture or dislocation, your vet will recommend an appointment at Moores Orthopaedic Clinic (or a similar practice in your local area). Remember that certain breeds of dogs might be more prone to issues with their spines or hips so do your research to ensure you are using the best preventative measures. Whatever the case, it’s important not to leave any problem unchecked; if your dog seems unwell, then don’t wait it out.

doggie1

Omg. :*)

Age: As your dog gets older, they’ll run into health problems more frequently. It’s nature, at the end of the day, but that doesn’t mean that you should let your dog age disgracefully. There’s certainly a lot that you can do to keep them in optimal health conditions. More frequent visits to the vet would be a good start. You want to keep on top of any problems that they might be having before they develop into anything serious or noticeable. You’ll also want to help them take things more easily; leisurely walks rather than strenuous ones, for example.

Looking after your dog like you would for any member of your family will surely result in a long and happy life for man’s best friend!

Adorable Featured Image By: Pexels

Falling For Autumn Nail Art

Standard
Falling For Autumn Nail Art

Hello everyone and happy Sunday!! As all of you know, Lil Red loves pretty nails, but is far from adequate at doing them on my own. While I opt for my talon style acrylic nails, there are ladies like the lovely Sandra from Finger Candy who can create gorgeously designed nails at ease. Sandra was kind enough to create three different tutorials on how to DIY beautiful autumn themed nails and I am so excited to share them with you on my page. Take a look:

Falling For Autumn Nail Art

Hello there, friends! Coming at you today from the brave new world of guest blogging, brave as in Sarah trusting me enough to write something for her that won’t embarrass us all? 😉 It’s really quite the exercise in trust, and I don’t intend to let Lil Red, kind hostess that she is, down…particularly since I have a mess of fun fall nail art to share with you, and I know you’re going to want to get in on that action. (You couldn’t embarrass me if you tried, darling! -Sarah)

“Woah, woah, woah,” you may be saying to yourself. “Nail art? Like, dangling pendants and jewels and stuff?” Well, sometimes – nail art is nothing if not deeply excessive. One of its many charms (ba dum chhhhhh)! But nail art can also be simple, and often all the more stunning for it. It’s just a nice little bonus when a manicure doesn’t take two hours and twenty different tools.

The following three tutorials cover a trio of easy nail art looks that are perfect for the upcoming fall season – dotted, multi-color leaves, a sponged-on blanket of leaves carpeting the forest floor, even a bit of that cold November Rain that the forecasters are always wailing on about.

“But that looks like so many polishes!” you also may be thinking to yourself (My, aren’t we chatty today?). True, eleven polishes across three manicures does seem like a lot, but they’re all fairly basic colors and finishes, and readily available at your local drugstore or beauty supply shop – no hard-to-find and/or expensive indies on this list. So feel free to deviate from the specific polishes that I’ve shown here (Which you’ll find at the bottom of this post.). In fact, I’d prefer it if you did, as some of these polishes have seen better days and may no longer be in production. So grab any old red, green, or yellow that you already have on hand, and don’t feel wedded to my choices; there’s no wrong answers here.

Having said all that, you will need a fine detail brush, a palette onto which to dab your polishes (I use the back of a plasticized DVD case, although the back of a plastic baggie also works very well.), a small-to-medium sized dotting tool, and three cosmetic sponges. Those points are non-negotiable, I’m afraid. 🙂

Tutorial - Tools Collage

Marbled Leaves Nail Art Tutorial

Tutorial - Dotted Leaves

These fun dotted nails utilize a technique that I like to think I came up with myself where you blend two different polishes together and then dot them onto your nails to create a cool marbled look. It’s a neat trick that lends itself well to fall’s bounty of multi-colored foliage.

For this mani, you’ll need your dotting tool, a cream or nude-colored base, and polishes in red, orange, yellow, grass green, forest green, and glittery gold.

Step 1: Paint your nails to opacity with a cream, off-white, or nude polish. Let dry.

Step 2: Dab a small blob of red and then yellow polish out onto your palette. Dipping your dotting tool first into the red polish and then into the yellow (or vice versa, it doesn’t really matter), dot the mixture onto your nails, two or three dots per nail.

Step 3: Repeat with a mixture of the yellow and grass green polishes.

Step 4: Repeat again with a mixture of the orange and forest green polishes.

Step 5: And then repeat again with the red and orange polishes. A little overlap will occur – that’s okay! You want these little marbled dots to look like layered drifts of crunchy autumn leaves, so the dots are bound to touch.

Step 6: Repeat the dotting (Last time, I promise!) with a mixture of the forest green and yellow polishes. Then, dabbing a small blob of the glittery gold polish out onto your palette, dip your dotting tool into the polish and apply to any spots that need a bit of filling-in or brightening-up, three or four dots per nail. Once dry, top with a high gloss topcoat and you’re good to go.

November Rain Nail Art Tutorial

Tutorial - November Rain

I can’t hear the words “November Rain” without wanting to immediately sprint into the desert in a lo-sho lace wedding gown and get hitched to some dude who looks better in floral spandex pants than I do. The ’90s were a confusing time, kids! But these striking nails are straightforward enough, and so very pretty.

For this manicure, you’ll need your detail brush, a black or very dark grey base, and polishes in light grey and shimmery silver.

Step 1: Paint your nails to opacity with the black or dark grey polish. Let dry.

Step 2: Dab a small dot of the light grey polish out onto your palette. Dip your detail brush into the polish. Holding the brush at a downward angle, swipe the polish onto your nails from the top right to the bottom left with a short flicking motion. It’s okay, even preferable, if the little slashes don’t look too “done” – you’re going for that sleeting rain kind of look, after all.

Step 3: Dab a small dot of the sliver polish out onto your palette. Then following the technique laid out in Step 2, add short, silver slashes to your nails just below the light grey slashes. You don’t want to cover the grey completely, merely enhance it. Once dry, top with a high gloss topcoat.

Forest Floor Nail Art Tutorial

Tutorial - Forest Floor

Finally, we have a fun, sponged-on manicure that mimics the kaleidoscope of rich autumn leaves that blanket a forest floor. Or your front lawn if you’re lucky enough to live in a lushly leafy climate like mine (Ontario, Canada, if you’re curious.). The other nice thing about these nails is, with the exception of the yellow and the addition of a medium brown, I used all of the same polishes as I did in the first manicure.

For this mani, you’ll need three cosmetic sponges, a cream or nude-colored base, and polishes in red, brown, grass green, orange, and forest green.

Step 1: Paint your nails to opacity with a cream, off-white, or nude polish. Let dry.

Step 2: Dab a small blob of brown polish out onto your palette. Taking one of your cosmetic sponges, dip it into the polish and dab it up and down a couple of times to remove any excess. Then, sponge the polish onto your nails, one little patch per nail (Or more if your nails are longer than mine, which would be pretty much everyone!) If the sponged-on bits look too light, that’s fine, you can always add more. But much like salting your food, you can’t remove too much, so sponge lightly to start, and then go over any bare spots again if you feel that it’s necessary.

Step 3: Repeat with the grass green polish.

Step 4: Repeat again with the red polish.

Step 5: And again with the forest green polish.

Step 6: And then one last time with the orange polish.

Step 7 (top photo): Dab a small dot of the glittery gold polish out onto your palette. Dip the last remaining clean side of one of your cosmetic sponges into the polish and lightly sponge all over your nails for that extra pretty fall twinkle. Let dry and then top with a high gloss topcoat.

So there we have her, friends, three cool, not-too-brutally-difficult nail art looks perfect for the upcoming fall season. If any of you try these manicures for yourself, I’d love to see your results! Finally, thanks to Sarah, Lil Red, for temporarily hosting Finger Candy in her little corner of the virtual sky; Tis a pleasure to be your neighbor. 🙂

************************************

Polishes Used:

  • Essie Cocoa Karma (brown) and Pretty Edgy (forest green)
  • KB Shimmer Chilly Pepper (red)
  • OPI My Vampire is Buff (cream) and My Signature is “DC” (shimmery silver)
  • Orly Bling (glittery gold)
  • Pure Ice Wild Thing (grass green) and Show Stopper (yellow)
  • Sally Hansen Insta-Dri Show Steel-er (light grey)
  • Wet n’ Wild Sunny Side Up (orange)
  • Zoya Genevieve (dark grey)

Weren’t those tutorials absolutely fabulous?! A million thanks, again, to Sandra of Finger Candy for sharing her nail art talent with lifewithlilred for my Falling For Fall guest bloggers series. What is your favorite Sandra original design? Are you going to try out any of these styles? I want to hear from all of you, so leave me a comment and let’s chat! Much love. -Sarah

Pinterest Inspired Fall DIY

Standard
Pinterest Inspired Fall DIY

Hello everyone and welcome to a super cool arts and crafts post made by the darling Sandra of Lifestyle.UA! I am really excited about this post because Sandra went through the trouble of making a video for my Falling For Fall series of how to create some gorgeous fall crafts, which has never been done on lifewithlilred before. Sandra will give you the step by steps on how to create a lovely candle and fall dream board for all of your DIY pleasure. Take a look:

Pinterest Inspired Fall DIY

Hello! Autumn is coming soon so it’s time to get ready. I have prepared two easy DIYs for all of you to decorate your homes with during the fall. My video will start with the Cinnamon Candle and then will move on to the Ombre To Do List Board. You will need the following materials listed below. Happy crafting!
What I used for the Cinnamon Candle: 
1. 3 candles
2. a pot
3. cinnamon
4. spices and dried flowers or fruits
What I used for the Ombre To Do List Board:
1. acrylic paint (white, red, orange)
2. a white board
3. hot glue
4. rope
5. a pen
And here is a step by step video of how to create them:

Have fun!
INSTAGRAM // @diy_lifestyle.ua and @sandrachery
Tumbr: Sandra Cherry “
Thank you so much again to Sandra for creating such fun crafts for my readers! How do you DIY in the fall? Are you crafty or craft store catastrophe? I want to hear from all of you, so leave me a comment and let’s chat! Much love. -Sarah

Autumn Layers Wish List

Standard
Autumn Layers Wish List

Hello everyone and welcome to a post in my Falling For Fall series compliments of Sycamore from SavageStyle. When the seasons change, it is so smart to create a wish list of the things that you need (and want!) to accommodate the weather in your area. Wish lists can stop you from the over spending that comes with buying clothes and accessories that you may not necessarily need, so that you can have some extra cash to splurge for the items that you’re lusting over, instead. Today, we’re going to look at Sycamore’s wish list for her fall wardrobe:

Autumn Layers Wish List

Vogue’s September issue just landed in my mailbox, and the stores (both brick-and-mortar and online) are full of velvet, wool, and leather boot lusciousness; it’s evident that Autumn is drawing near.

This season always stirs up excited nostalgia for me. I guess it probably stems from a mix of going back to school – and the new wardrobe that came with it – seeing all of the new Fall collections, and DEFINITELY my memories of layering up and stalking coffee shops on the high streets of London to caffeinate & steal a cigarette with my classmates before Art History class.

It’s the season that makes me wistful for stashing an umbrella in my purse, riding the tube to the Eastside and back, getting forever lost in the streets, and relinquishing my sorrows in a new pair of kid leather gloves from Selfridges. Not to mention that lovely contrast of sipping a hot coffee while walking through crisp evening air and the crunching leaves beneath my boots.

While I will always have a place in my heart for bohemian florals and that “easy breezy” vibe (I am a sun sign, after all), the current over-saturation of that look has got me yearning for something edgy, new, and layered.

I saw Atomic Blonde recently, and it sparked my first craving for colder weather. Charlize Theron wore so many great looks in that film, but I think the one that takes the cake is this look from the kitchen fight scene:

layer1

 You go, girl!

Knee-high boots and mini skirts are one of my favorite cold weather combinations. It’s all the sexier when you add garter socks, a giant sweater, coat, and gloves on top. This is how you do fall/winter French girl sexy – you only have a few inches of skin showing but that goes a long way!

Some of the new pieces on my wish list this season are:

layer2

               Prada fur-trimmed wool-blend coat (mytheresa.com)

layer3.jpg

Isabel Marant Heina printed mini skirt (M’oda ‘Operandi)

layer4

  Zara sweater with contrasting cuffs

layer5

Stuart Weitzman Alljill over the knee boot (Nordstrom)

layer6

MONSE shearling bomber with belts (M’oda ‘Operandi)

layer7.jpgZara short sleeve sweater

layer8.jpg

Courrèges wool multi-color mini skirt (M’oda ‘Operandi)

layer9.jpg

  Tibi Alexis boot (M’oda ‘Operandi)

layer10.jpg
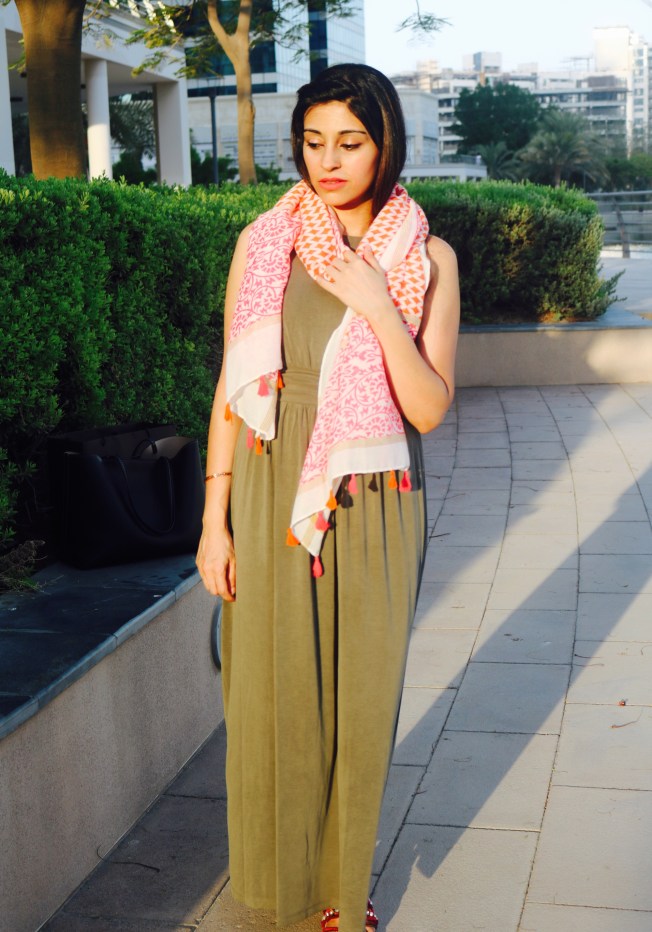
This whole look from
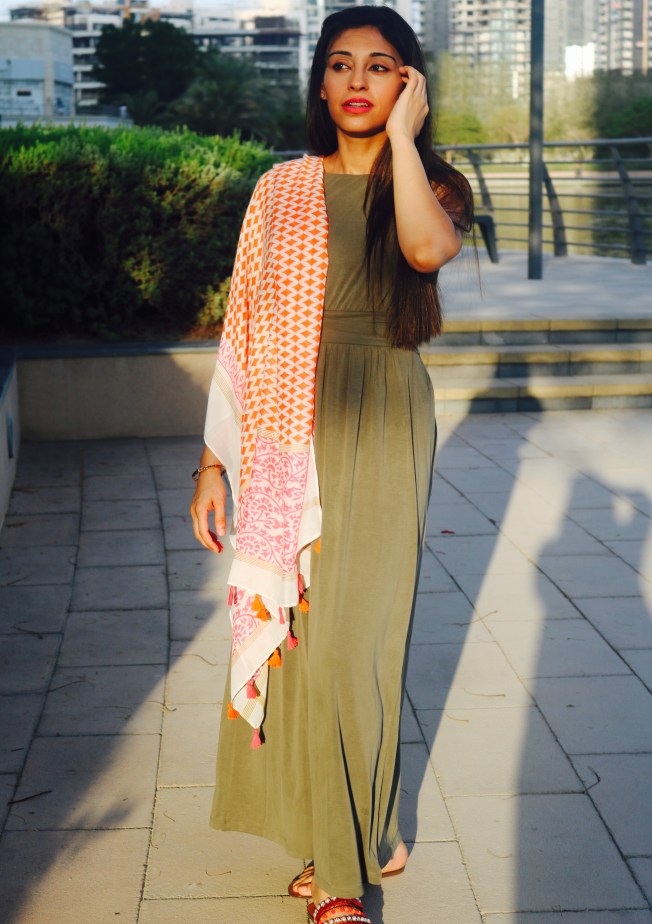
 Zara

It’s still pretty hot here in LA, so I don’t think that I’ll be layering up for another month or two, but at least that means I have ample time to plan. I hope I’ve inspired you during the colder weather to create some layered looks of your own!

Xx~ Sycamore

Thank you so much again to Sycamore of SavageStyle for sharing her Autumn Layers Wish List with us! What is on your cold weather wish list? What store supplies most of your fall wardrobe? I want to hear from all of you, so leave me a comment and let’s chat! Much love. -Sarah

Featured Image From: Atomic Blonde with Charlize Theron