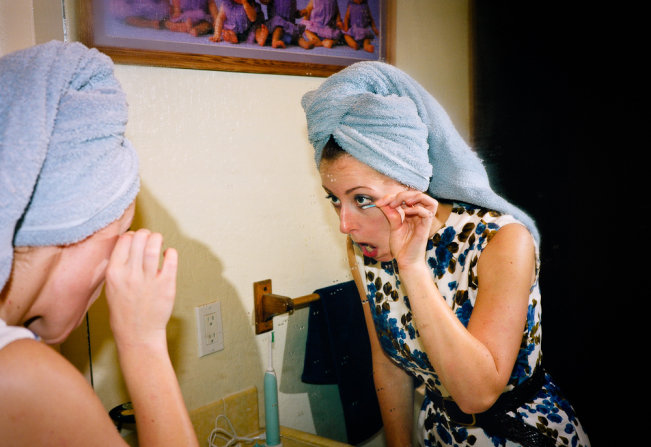
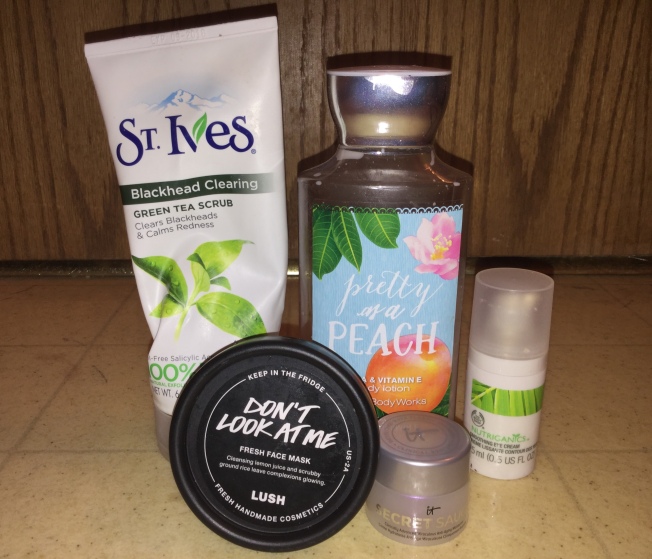
Tag Archives: beauty

October 2017 Finishes

Standard
October 2017 Finishes

Hi everyone and happy November! Today we are going to kick off the month with a look back on my beauty empties from October. It feels like it was just yesterday! To me, October felt like it dragged on for an eternity. And, to make matters worse, it was a really shitty month for yours truly in general. Needless to say, I’m excited to be rid of all of these products that I finished up last month and am looking forward to hopefully brighter times ahead. Take a look at my October empties and let’s discuss:

oct.jpeg

Would I Use Again?

  • St. Ives Blackhead Clearing Green Tea Scrub: YES
  • Bath & Body Works Pretty As A Peach lotion: YES
  • The Body Shop Nutriganics eye cream: YES
  • Lush Don’t Look At Me face mask: MAYBE
  • IT Cosmetics Secret Sauce moisturizer: NO

Why/Why Not?

St. Ives Scrub: As you guys know, I have a problem with blackheads around my nose piercings. Is it a huge issue? No. But would I prefer them gone? Of course. I can’t say that the Green Tea scrub by St. Ives is my favorite one out of their selection. However, I wouldn’t say no to using this again if it were bought for me during my birthday/holiday skin care restock or if it were on sale.

My main issue with this scrub is that it just isn’t gritty enough to completely clear away blackheads. It does get some of them, I’ll give it that. But, for the majority of the pesky pen marks on my nose, you can see that the black tip is gone but the skin where it was is still raised, which shows that the problem is still lurking underneath the surface. I will say that my skin does feel and look nice after using this scrub but the purpose of eliminating blackheads is far from achieved. It took me a month and a half to finish using this scrub.

B&BW Lotion: We all know by now that peach is one of my favorite fragrances when it comes to bath and body care. We also all know that I really like this lotion a lot so no further explanation is needed, lol. It took me about six or seven full body uses to finish this product.

TBS Eye Cream: Obviously, I used up some old favorites in October, because everyone knows by now that this is my eye cream of choice. The Body Shop’s Nutriganics eye cream keeps any premature wrinkling of the sensitive skin around my eyes at bay. However, I do wish that this eye cream did more to help out with dark under eye circles. We can’t always get what we want, though, and for the value of this eye cream (I got it on sale for about eleven dollars.) and the fact that it lasts me around five months definitely keeps me from complaining too much!

Lush Face Mask: The Don’t Look At Me face mask is the first skin care product from Lush that I ever used and, although I enjoyed it, I don’t think that I would ever make the forty-five minute trip to the nearest Lush again to purchase it. If this mask or any other Lush product were given to me as a gift, I would be all over it. But, in my opinion, the trip out to Lush just isn’t worth the reward. Despite not making a special trip out to buy this mask again, you can see in my Face Mask Festivities post that it did make my skin look radiant and, although the mask was cold when you first apply it, it was quite pleasant to use. I was able to get seven or so uses from the Don’t Look At Me mask.

IT Cosmetics Moisturizer: I got this sample sized moisturizer for free while doing some early holiday shopping online at Sephora. This mini IT Cosmetics Secret Sauce moisturizer gave me five uses, which really isn’t enough to tell if it did anything or not. I can’t say that I was really impressed with it either way, though, and would rather just ball on a budget with my drugstore/sale price TBS moisturizers.

As I mentioned above, I am so happy to be rid of all of these products – even the ones that I liked. October sucked for Lil Red so it will be nice to have some happier memories associated with the bath and body and skin care goodies that I use up in November.

So there you have it, my October 2017 Finishes! Have you used any of the above products before? What are your thoughts on them? I want to hear from all of you, so leave me a comment and let’s chat! Much love. -Sarah

Nipping At Your Nose: Don’t Let The Cold Weather Damage Your Skin!

Standard
Nipping At Your Nose: Don’t Let The Cold Weather Damage Your Skin!

Whether it’s something that you’re happy about or not, there’s no denying that summer is well and truly over and we’re already rushing headlong into those chilly winter months. For some people, this is what they’ve been waiting for all year long. And for others, it’s time to slog through miserable weather until spring finally rolls back around. Either way, there’s one thing that everyone needs to keep in mind: the cold weather can be a real nightmare for your skin. You might have been used to the summertime leaving your skin clear and glowing, but the cold weather can undo all of that if you’re not careful. Here are a few things that you can do to prevent that from happening, even as the weather gets colder and colder:

Find The Right Products:

The kinds of skin products that you use during the summer are often going to be fundamentally different to the ones that you use when it gets colder. In fact, other than sunscreen, you probably will find that you need to put a lot less product on your skin during the warmer periods. However, cold weather can dry out your skin seriously fast, causing all kinds of problems. Check out this page with ranking and reviews of the best retinol creams to see if you can find the best possible options for your skin. Everyone’s skin is different, and you want to make sure that you find something that is properly suited to you.

Dress Warmly:

Even if you’re a big fan of the winter, no one likes being cold, and your skin is no exception. By wrapping up warm, you’re going to make life much easier for your skin. The important thing is to keep your core warm. If you can do that, then your body can focus on keeping your hands, feet, and face at a somewhat comfortable temperature. This is especially important since your face is the only part of your body that is pretty much always exposed to the elements no matter what.

Get Enough Sun:

Of course, the temperature isn’t the only reason that a lot of people’s skin tends to suffer during the winter months. The other reason is simply that they don’t go outside nearly as much. After all, why would you? A walk in the park is a lot less appealing when you end up with frost forming in your eyebrows! However, staying inside all winter can lead you to not getting enough vitamin D. Not only can this have a serious impact on your skin but it can affect your overall health, as well. Make sure that you still take the opportunity to get out into the sun, even if it’s not exactly sunbathing weather. On the coldest, wettest, and most dreary days, you can also try out some light therapy within your warm and dry house. Red light therapy is particularly good for Vitamin D; have a read through of some Platinum Therapy Lights reviews to see how you can get this set up.

No matter what your opinion of the winter is, nothing will change its arrival, so the best thing to do is embrace it. Get your cozy sweaters on, make yourself a cup of cocoa, and curl up by the fire. And even if you really hate it, just remember that spring will be here before you know it!

Featured Image By: Pexels

Vampire Vixen & Clowning Around Costume Makeup

Standard
Vampire Vixen & Clowning Around Costume Makeup

Hello! Today we are going to explore two more costume makeup looks compliments of Allison, who taught all of you on Sunday how to create a gorgeous sugar skull MOTD. Once again, be sure to follow Allison on Instagram at: allicat.mua for more of her amazing makeups like the ones seen below:

Vampire Vixen & Clowning Around Costume Makeup

*Allison mentioned in her sugar skull tutorial that all of the makeup products used in her looks can easily be duped with drug store or Halloween store cosmetics and the same rings true for both of the looks seen below. Bear in mind that these are all basic steps, and Allison encourages all of you to get as creative as you wish with her looks!

Vampire Vixen

Products Used:

Base/Face: 

  • bareMinerals Combo Control primer
  • Urban Decay Eye Primer Potion
  • Kat Von D Lock-It concealer in White Out
  • KVD Lock-It Foundation in Light 42
  • KVD Shade and Light contour palette
  • White face powder from Spirit Halloween
  • Rubies fake blood

Eyes/Lips:

  • Anastasia Beverly Hills Modern Renaissance palette
  • KVD Serpentina palette
  • KVD Ink liner in Trooper
  • IT cosmetics Superhero mascara
  • Eyelure false lashes

Step By Step:

*Note that this look can easily be a beautiful every day makeup look sans the blood!!

  1. Apply primer all over your face and eye primer, as well. Set the eye primer with flesh-colored eyeshadow.
  2. Face First: Apply under eye concealer and foundation, then set with a white finishing powder. Contour using a navy or dark, cool-toned shadow.
  3. Fill in brows if necessary.
  4. For the eyes, apply a transition and crease shade, then BLEND. Apply a black shadow as a base only on the lid and BLEND. Then, layer a burgundy shade over top and BLEND again.
  5. Apply liner, mascara, and false lashes if desired.
  6. Apply fangs and have fun with the blood!

Clowning Around

Products Used:

Base/Face:

  • bareMinerals Combo Control primer
  • Urban Decay Eye Primer Potion
  • Kat Von D Lock-It concealer in White Out
  • KVD Lock-It Foundation in Light 42
  • KVD Shade and Light contour palette
  • White face powder from Spirit Halloween

Eyes/Lips:

  • NYX white eyeshadow base
  • KVD Mi Vida Loca Remix palette
  • bareMinerals Pewter loose eyeshadow
  • Anastasia Beverly Hills Dipbrow in Dark Brown
  • KVD Everlasting liquid lipstick in Echo
  • KVD Glimmer Veil lipstick in Satellite and Rocker
  • KVD Ink liner in Trooper
  • IT Cosmetics Superhero mascara
  • Spirit Halloween blue false lashes and press-on pearls

Step By Step:

  1. Apply primer all over your face and eye primer, as well. Set eye primer with flesh-colored eyeshadow.
  2. Face First: Apply under eye concealer and foundation, then set with a white finishing powder. Contour using a navy or dark, cool-toned shadow.
  3. Fill in brows if necessary.
  4. Outline the triangle shape using the white eyeshadow base and a small, fine brush.
  5. Apply and blend out your desired eyeshadow shade along the outside and inside of the triangles.
  6. Fill in the triangles with shimmery shadow.
  7. Outline the triangles with glitter.
  8. Apply eyeliner, mascara, and false lashes if desired.
  9. Apply press-on pearls to the tips of the triangles.
  10. Apply lipstick or colored shadow for the nose.
  11. Apply lipstick and over line it to create as large and creepy of a smile as you want.

allison5

^^^ Many thanks to Allison for creating a total of three stunning looks for lifewithlilred’s Halloween Heaven guest bloggers series. Want more? Be sure to follow Allison’s Instagram page at: allicat.mua ! What is your favorite look that Allison created? Which look do you plan on trying out this Halloween? I want to hear from all of you, so leave me a comment and let’s chat! Much love. -Sarah

Easy Peasy Scarecrow Costume Makeup

Standard
Easy Peasy Scarecrow Costume Makeup

Hi everyone and welcome to a simple and sweet scarecrow costume makeup tutorial compliments of my friend, Sarrah, from Vegan From Mars. Sarrah created this look special for the readers of my Halloween Heaven guest bloggers series who are in need of a fast and cost friendly costume. So grab your blue jeans, a huge flannel, and braid your hair and follow this step by step guide to becoming the most adorable scarecrow at the Halloween party that starts in two hours!

Easy Peasy Scarecrow Costume Makeup

Hello friends! Halloween is upon us and it’s time to get creative. I’ve come up with this super cute scarecrow makeup look for those who want to keep it simple or are not the most skilled with a makeup brush. It’s insanely easy – just five steps! And the best part? You can complete this look with the makeup that you already have in your collection (I only had to buy one product!).

scarecrow1

Step By Step:

Step 1: Do your makeup how you normally would. For me, that means a tiny winged eyeliner, some mascara, and the lightest of all light contours. Now you’re ready to get spooky-cute!

Step 2: Start by smiling. That’s right, look right in the mirror and give yourself a big smile. You see the cute apples of your cheeks? You’re going to draw big orange circles right there. I used a light orange from my Wet N’ Wild “Brights” paint palette to get the shape down. Then, I went over it with the Wet N’ Wild Liquid Catsuit liquid lipstick in the shade “Terrifying Tangerine”. I used this same technique on my lips.

Step 3: Take any black eyeliner (I recommend any liquid eyeliner) and draw a curved line from the corners of your lips to your new circular orange cheeks. Then, draw vertical lines along that line to form your stitches.

Step 4: Using the same technique as your cheeks, use your orange color to fill in the tip of your nose and bring it to a slight point towards the top. Afterwards, trace around the shape you just made with the black eyeliner and draw stitches along the outline.

Step 5: Use this time to add any finishing touches and little details! I added some stitches to my forehead. I also took white liquid eyeliner to add a little dimension to my nose, cheeks, and lips.

And that’s all, folks! I hope you loved this quick tutorial and will try it out for yourself!

^^^ Many thanks again to Sarrah for creating such a darling makeup look for my Halloween Heaven guest bloggers series! Lil Red is so not a makeup girl and this tutorial gave me hope that I, too, can pull together a fun and cute costume if my Halloween activities this year calls for it!

What are some costume ideas for those who have no idea what they’re going to be yet? What are some other simple and sweet last minute costumes? I want to hear from all of you, so leave me a comment and let’s chat! Much love. -Sarah

Sweet As Sugar Skull Costume Makeup

Standard
Sweet As Sugar Skull Costume Makeup

Hi everyone and welcome to the first post in lifewithlilred’s Halloween Heaven guest bloggers series! This time around, I did something a bit different while on the hunt for participants for Halloween Heaven – I put my call of action on Facebook. My friends list is filled with so many talented makeup artists that it felt foolish to not try and include them, since part of the fun of Halloween is all about the costume makeup.

One of the lovely ladies who answered my cry for help is the darling Allison, who you can find at: allicat.mua on Instagram. Today, Allison is going to teach all of you how to apply a spooky beautiful sugar skull costume makeup. Then, she will be back later on in the series if you are in need of some more Halloween makeup inspiration for any upcoming parties. Take a look:

Sweet As Sugar Skull Costume Makeup

sugar1sugar2

Products Used:

Base/Face:

  • bareMinerals Combo Control primer
  • Urban Decay Eye Primer Potion
  • Kat Von D Lock-It concealer in White Out
  • KVD Lock-It Foundation in Light 42
  • White face powder from Spirit Halloween

Eyes/Lips:

  • Black face paint crayon from Spirit Hallowen
  • KVD Mi Vida Loca Remix palette
  • KVD Alchemist palette
  • Anastasia Beverly Hills Dipbrow in Dark Brown
  • KVD Everlasting liquid lipstick in Echo
  • KVD Glimmer Veil lipstick in Satellite
  • KVD Ink liner in Trooper
  • IT Cosmetics Superhero mascara
  • Press-on pearls from Spirit Halloween

Step By Step:

*Please note that these are basic steps. This look allows you to be as fun and creative as you want. There is no right or wrong. The products that I used can easily be duped with drugstore items or any traditional Halloween store cosmetics.

  1. Apply primer all over your face.
  2. Apply eye primer, as well, and then set it with a flesh-colored eyeshadow.
  3. Face First: Apply under eye concealer and foundation, then set it with a white finishing powder. Contour using a navy or dark, cool-toned eyeshadow.
  4. Using the face paint crayon, draw a circle around each eye and fill it in with the crayon or black eyeshadow.
  5. With a small brush and colored face paint or eyeshadow (You could use lip liner for this step, as well.), draw your designs. Be creative!
  6. Apply lipstick or leave it whited out. Use eyeliner to draw the lines or teeth to complete the look.

sugar4sugar3

^^^ So ghoulishly gorgeous! Major thanks again to the insanely talented Allison for sharing her skills with us. Do be sure to give her Instagram (allicat.mua) some love if you want to see more of her amazing work! What are you being for Halloween? Do you have a sugar skull makeup look to show off? I want to hear from all of you, so leave me a comment and let’s chat! Much love. -Sarah

October Bath & Body Works Freebie

Standard
October Bath & Body Works Freebie

Hi everyone and TGIF! Another month brings another Bath & Body Works freebie to add to my body care hoard. I’ve grown pretty fond of using my coupon for a free travel sized product to get a shower gel mini as of late. They are perfect (obviously) for overnight trips and vacations but they are also nice for when you feel like switching things up from your normal full sized body washes. Take a look at my mini shower gel steal and let’s discuss:

septt

Lol. Yeah. I did get Japanese Cherry Blossom. Despite this scent reminding me of my grade school’s locker room at gym class, I just couldn’t help myself from grabbing it. This soft and pretty but not too sweet floral fragrance spoke to me for some reason and I just couldn’t resist the bright red coloring of the shower gel!

I normally select my freebies with gift giving in mind, because they make for perfect present add ons. However, this shower gel is all for me. It would be sinful for anyone but Lil Red to use it, after all. 😉

So there you have it, my October Bath & Body Works Freebie. What is a scent that you love to hate? Which B&BW fragrances are your faves? I want to hear from all of you, so leave me a comment and let’s chat! Much love. -Sarah

New Black & Champagne Glitter Nails

Standard
New Black & Champagne Glitter Nails

Hi everyone and happy Thursday! After ten looooong months of having the same set of acrylics on, I finally got new nails this week. I haven’t had a chance to add my gemstone crosses to the middle fingers because I have absolutely no clue where the super glue stash is in my home. But, I do LOVE the champagne pink accent nails against the harsh black on my new set so take a look and let’s discuss:

nails6

Instead of going to my normal salon hang out of Empress Nails to get this set done, I was sort of a traitor and went to LT Nails, instead, which is also close by to my living quarters. Don’t get me wrong, I freaking LOVE my nail tech, Steve. However, he has never put on a set of my acrylics before and I needed to go to someone that I could trust (Not saying that I don’t trust him, but filling nails and applying them is very different.).

I went to Anne at LT Nails all the way back in January to get my last set on and I was long overdue for new nails. I noticed during the last fill that I got that my nails were insanely yellow and because they were so brittle, they were cracking and breaking nonstop. It was miserable. Although it took ten months to finally get new nails, I remembered what a great job was done over at LT and scheduled an appointment at the salon with Anne.

In one hour and fifteen minutes, Anne was able to soak off my old set and apply, shape, and polish my new nails. She worked quickly and efficiently and it was definitely a job well done. One thing that Anne did differently than my Empress Nails techies was that she shaped the nail before the acrylic even went on. This made the shape more sharp and precise and definitely saved a lot of time, as well. The nails are not as long as I would like, but they never are when I get a new set so I am looking forward to them growing out!

I will be getting my nails painted black until the day that I die, but I am so obsessed with the bubbly champagne pink accent nails. Lil Red loves nothing more than sweet colors against punk rock black so this accent nail choice is no exception. The color is as pretty as a New Year’s Eve party dress and I love the bronze and silver glitter against the muted blush pink. I would definitely get another color combination like this again for the holiday season and it is easily one of my favorites that I’ve had in a long time.

So there you have it, my New Black & Champagne Glitter Nails! What accent nail color should I get next? What color of nail polish are you wearing right now? I want to hear from all of you, so leave me a comment and let’s chat! Much love. -Sarah

Walgreens Freebie Bag

Standard
Walgreens Freebie Bag

Hi everyone and happy Tuesday! I’ve been frequenting Walgreens a few times within the past few months because they are the only store in my area that still carries my beloved Vidal Sassoon hair dye. Normally, when I stop in the store, I just take the lot of how ever many boxes of the Runway Red color that they have so that I’ll have a healthy amount on back stock if, god forbid, anything happens to the Vidal Sassoon London Luxe collection.

When I went into the store over the weekend, I was treated to a beauty goodie bag full of amazing coupons and samples just for buying what I was going to purchase, anyway. Not only that, but because I have their reward card, I got five dollars added on to it for my next hair dye purchase. Clearly, I picked the right day to restock my hair dye! Take a look at the spoils of my goodie bag:

freeeee

When the cashier handed me the bag, it was literally filled to the brim with freebies. I was so curious as to what was in it that I couldn’t wait till I was home to open it, so I sat in my car and was blown away at the contents of the bag, which included:

  • Crest Whitening Therapy tooth paste
  • Olay retinal eye cream
  • CeraVe complexion bar
  • Aveeno lotion
  • Jergens lotion
  • Pocket mirror
  • FAT stack of coupons
  • Lotion samples
  • Whitening strips
  • 3 packets of various shampoos and conditioners
  • Moisturizer samples
  • Hair, skin, and nails gummie samples
  • And more!

I had a blast showing off the contents of my bag at home and dividing up the booty to my family, since there were quite a few things that I don’t use. I’ve never been “anti Walgreens” but this amazing freebie surprise definitely makes me feel more inclined to shop there more often. Now, if only Target and TJMaxx would start giving away goodie bags like this! #wishfulthinking

So there you have it, my Walgreens Freebie Bag! What would you like to try from the goodie bag that I received? Which store gives away the best freebies and coupons? I want to hear from all of you, so leave me a comment and let’s chat! Much love. -Sarah

Featured Image By: Walgreens

Chin Up: What To Expect From An Ultherapy Session

Standard
Chin Up: What To Expect From An Ultherapy Session

We smile, yawn, gasp, and make a lot of different facial expressions during our lives. It’s a good thing, though, and a part of being human – but life leads to wrinkles and saggy skin over time. An increasing number of people are finding new ways to make sure that their skin stays tight and young-looking for as long as possible, and it doesn’t have to put you under the knife, either.

If you’re new to the methods of ultherapy, it’s smart to prepare yourself a bit before the first session. The good news, is that after it’s done, you won’t have to prepare yourself at all for other people’s reactions as the results are gradual and allow you to age with grace, rather than looking like you’ve been frozen in time.

What would I use it for?

If you feel like areas of your face are starting to slope, you may want to do something drastic about it. Some people head off for a numbing session of botox; others go for more permanent solutions, such as plastic surgery. While you need to choose the alternative that would work best for you, it’s always smart to look into every option out there – also the non-invasive ones like ultherapy.

Ultherapy uses focused ultrasounds in order to stimulate more collagen growth deep beneath your skin. A lot of people use it to lift their eyebrows or eyelids when they reach a certain age as the saggy skin may bother them, in general, and keep them from seeing as well as they would have been able to if the skin was lifted.

The same goes for aesthetic purposes and nothing should keep you from straightening out those wrinkles around your cleavage or make the skin in your neck or jawline a bit firmer if it could boost your confidence.

How long is the downtime?

Unlike many other alternatives in terms of giving your face a quick lift, ultherapy requires no downtime. You can literally step right out of the clinic and meet up with your friends or co-workers without any of them ever knowing.

The disadvantage to this, is that you may not see the results that you’re longing for as soon as you’d like, and it can take up to six months before the full effect hits you. It makes it a bit easier to get up in the morning and have a look in the mirror during these months, though, as you’ll be keeping a rigid eye on your skin from now on!

You will only need one session to get the kind of results that last for up to 18 months, and each of them will take between half an hour to two and a half hours, depending on how much work you want done. Luckily, our society is advanced enough to let everyone go about with their beauty business as they please. Want to wear no makeup one day and a full face the following day? Or how about a small nip and tuck to boost your self esteem? No problem, it’s all up to you.

Of course, it’s important to choose the procedure that you feel is best for you, so think it over and enjoy the beauty of confidence.

Featured Image By: Pexels

September 2017 Finishes

Standard
September 2017 Finishes

Hellooo everyone and TGIF. Holy moly – can you believe that it’s already the end of September?! Time is completely flying by, and the end of another month means that it’s time to talk shop on all of the beauty products that I finished up during September’s thirty day run. Take a looksee and let’s discuss:

sept

Would I Use Again?

  • Softsoap Sweet Honeysuckle & Orange Peel shower gel: YES
  • CPR Heat Protecting spray: YES
  • St. Ives Pink Lemon & Mandarin Orange scrub: YES
  • The Body Shop Vitamin C Skin Boost: YES
  • The Body Shop Vitamin E moisturizer: YES

Why/Why Not?

Softsoap Body Wash: I loooove me my Softsoap body washes. They lather so well, smell amazing, and are a wonderful value. The Sweet Honeysuckle & Orange Peel scent is definitely my favorite, though. I love citrus scents and this gel is so bright and invigorating, even when it’s combined with the soft, floral sweetness of honeysuckle. It took me about a month to finish this gel. However, as I was not the only one using it while I was on vaca for a week earlier this month, it would have lasted longer.

CPR Spray: I won this from a giveaway (Woohoo!) and I really enjoyed using it. I flat iron my hair almost every day, so a good heat protecting spray is a must. This CPR protector worked very well in not only saving my hair from damage, but leaving it shiny and sleek because it’s infused with argon oil. I don’t remember exactly what this product smelled like, but I know that it was good or I wouldn’t have been putting it in my hair! It took me about three or so months of daily use to finish this protecting spray.

St. Ives Scrub: I love all of the different scrubs that St. Ives has to offer, but the Pink Lemon & Mandarin Orange is my favorite, aside from the Apricot one! Facial scrubs are a must in my skin care arsenal and this one definitely did its job well. Not only did the sweet/tart scent smell fantastic, but it left my skin completely glowing after every use. The moderate amount of grit that this scrub offers helped buff away all of my imperfections and my skin looked and felt totally radiant. It took me one month of daily use to finish this scrub.

TBS Skin Boost: You guys already know how much I love this product, so nothing needs said here! It took me about two and a half months to finish my Skin Boost.

TBS Moisturizer: You guys also already know how much I love this product, so nothing needs said here, either! It took me one month to finish this moisturizer.

September gave me a perfect month of product empties, because I would use all of them again in a heartbeat. There was nothing about any of the products listed above that I didn’t like and I feel like each one gave me the most bang for my buck and tons of beauty benefits, to boot!

So there you have it, my September 2017 Finishes! Which products did you finish up this month? Have you used any of my empties before? I want to hear from all of you, so leave me a comment and let’s chat! Much love. -Sarah