Tag Archives: easy peasy

Let’s Make Caramel Apple Bites

Standard
Let’s Make Caramel Apple Bites

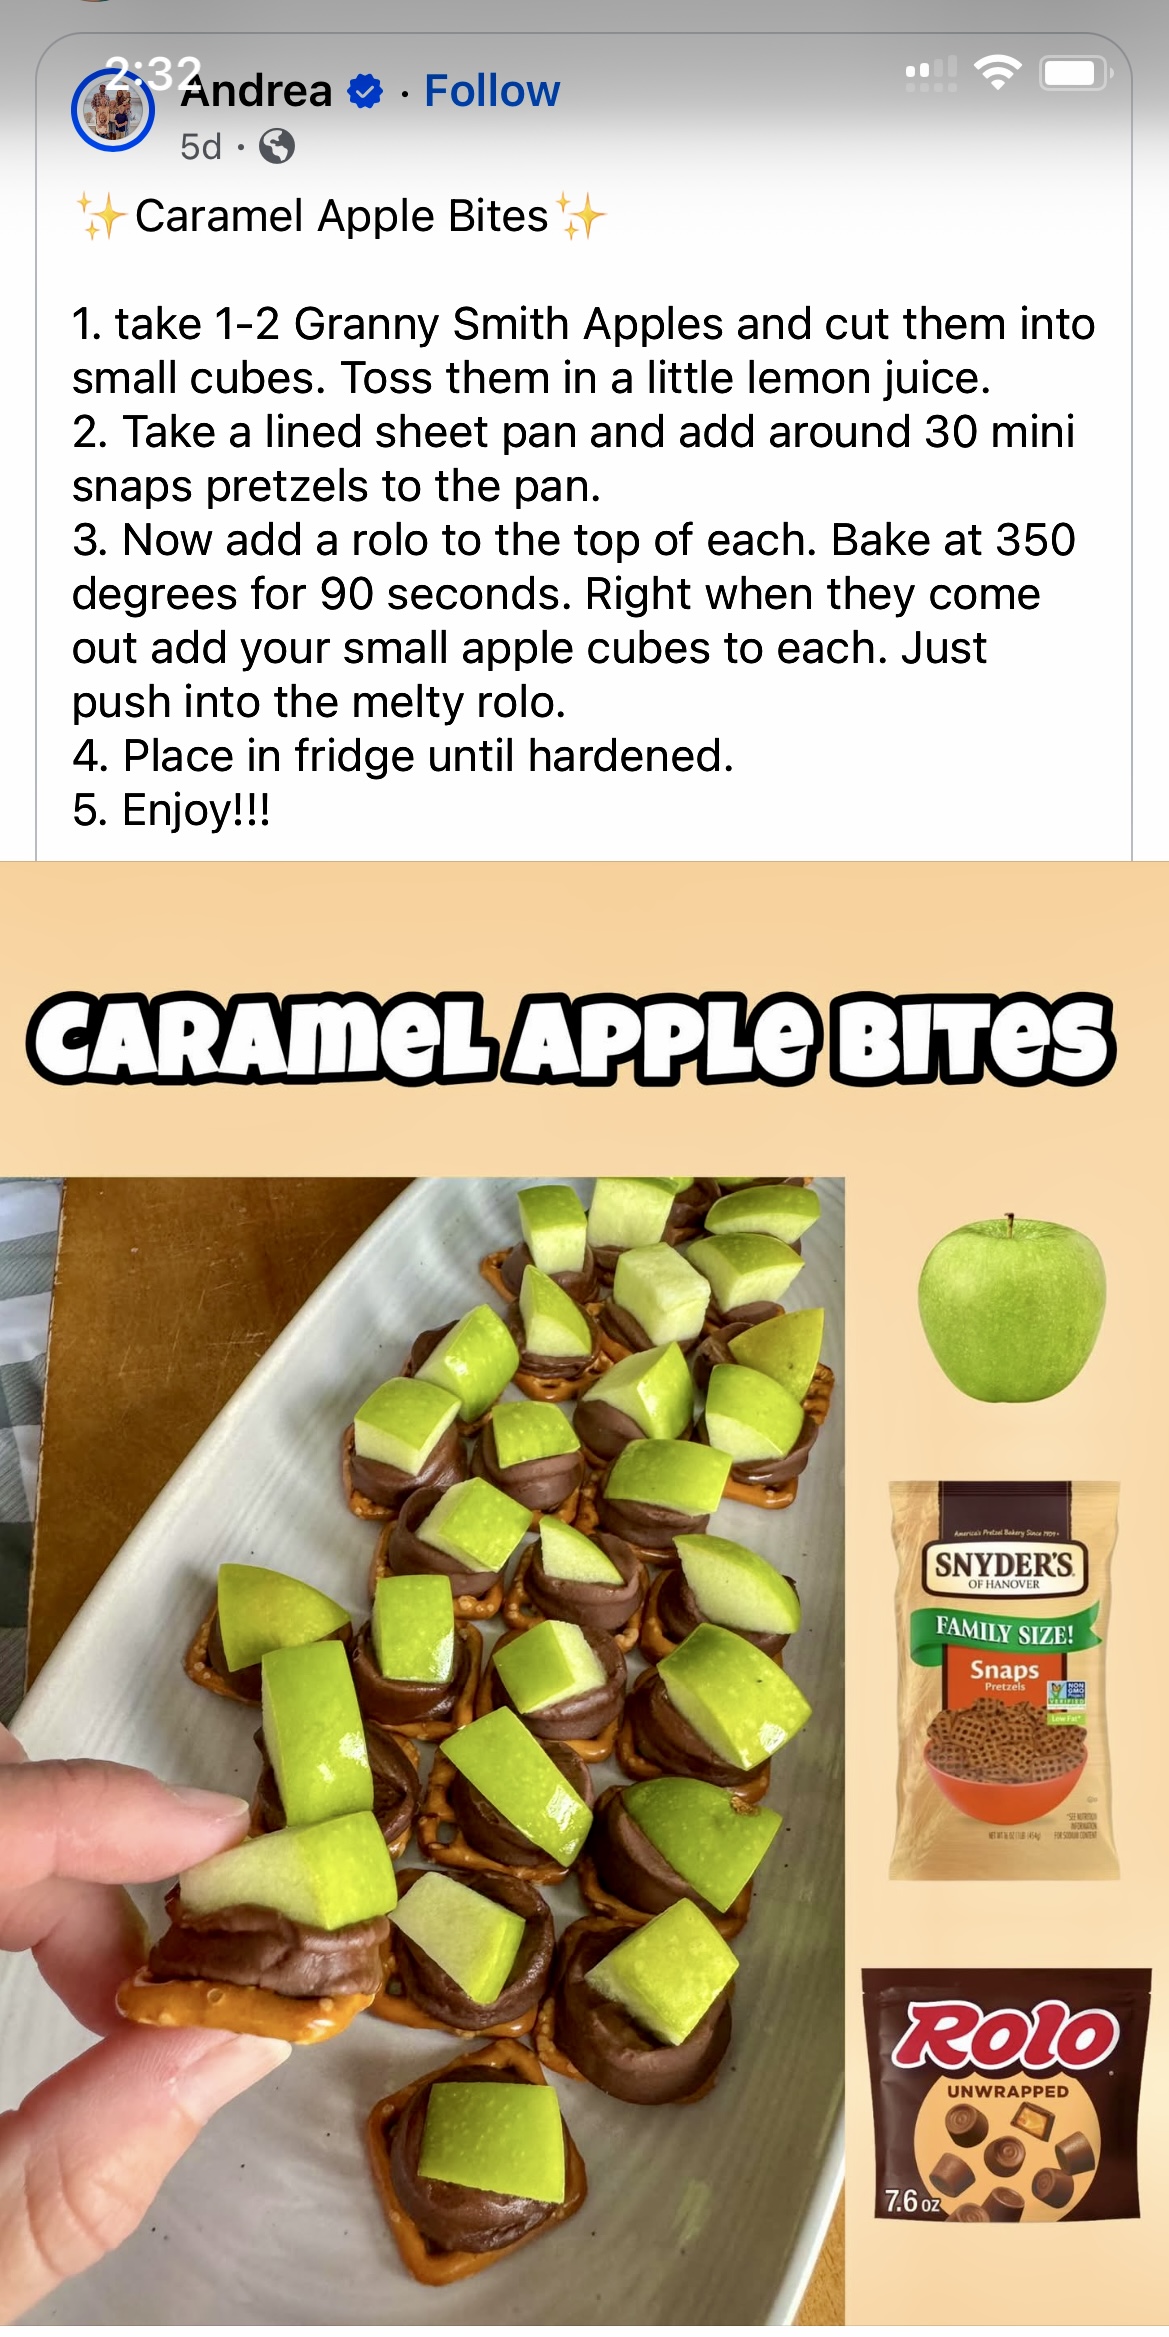
Hello! If there is one thing that I am guilty of, it is endlessly scrolling through Facebook and saving a bunch of recipes that I will never make. Seriously, I must have hundreds of saved videos and posts at this point that I have done literally nothing with lol. UNTIL THIS PAST WEEK! A post for Caramel Apple Bites showed up on my newsfeed from a creator named Andrea and I just had to try them. I LOVE all things caramel apple and this tasty treat only required three ingredients which is my kind of recipe. They were a huge hit with me, Johnny, and my dad! Check it out and be sure to follow her page for more yummy and simple recipes:

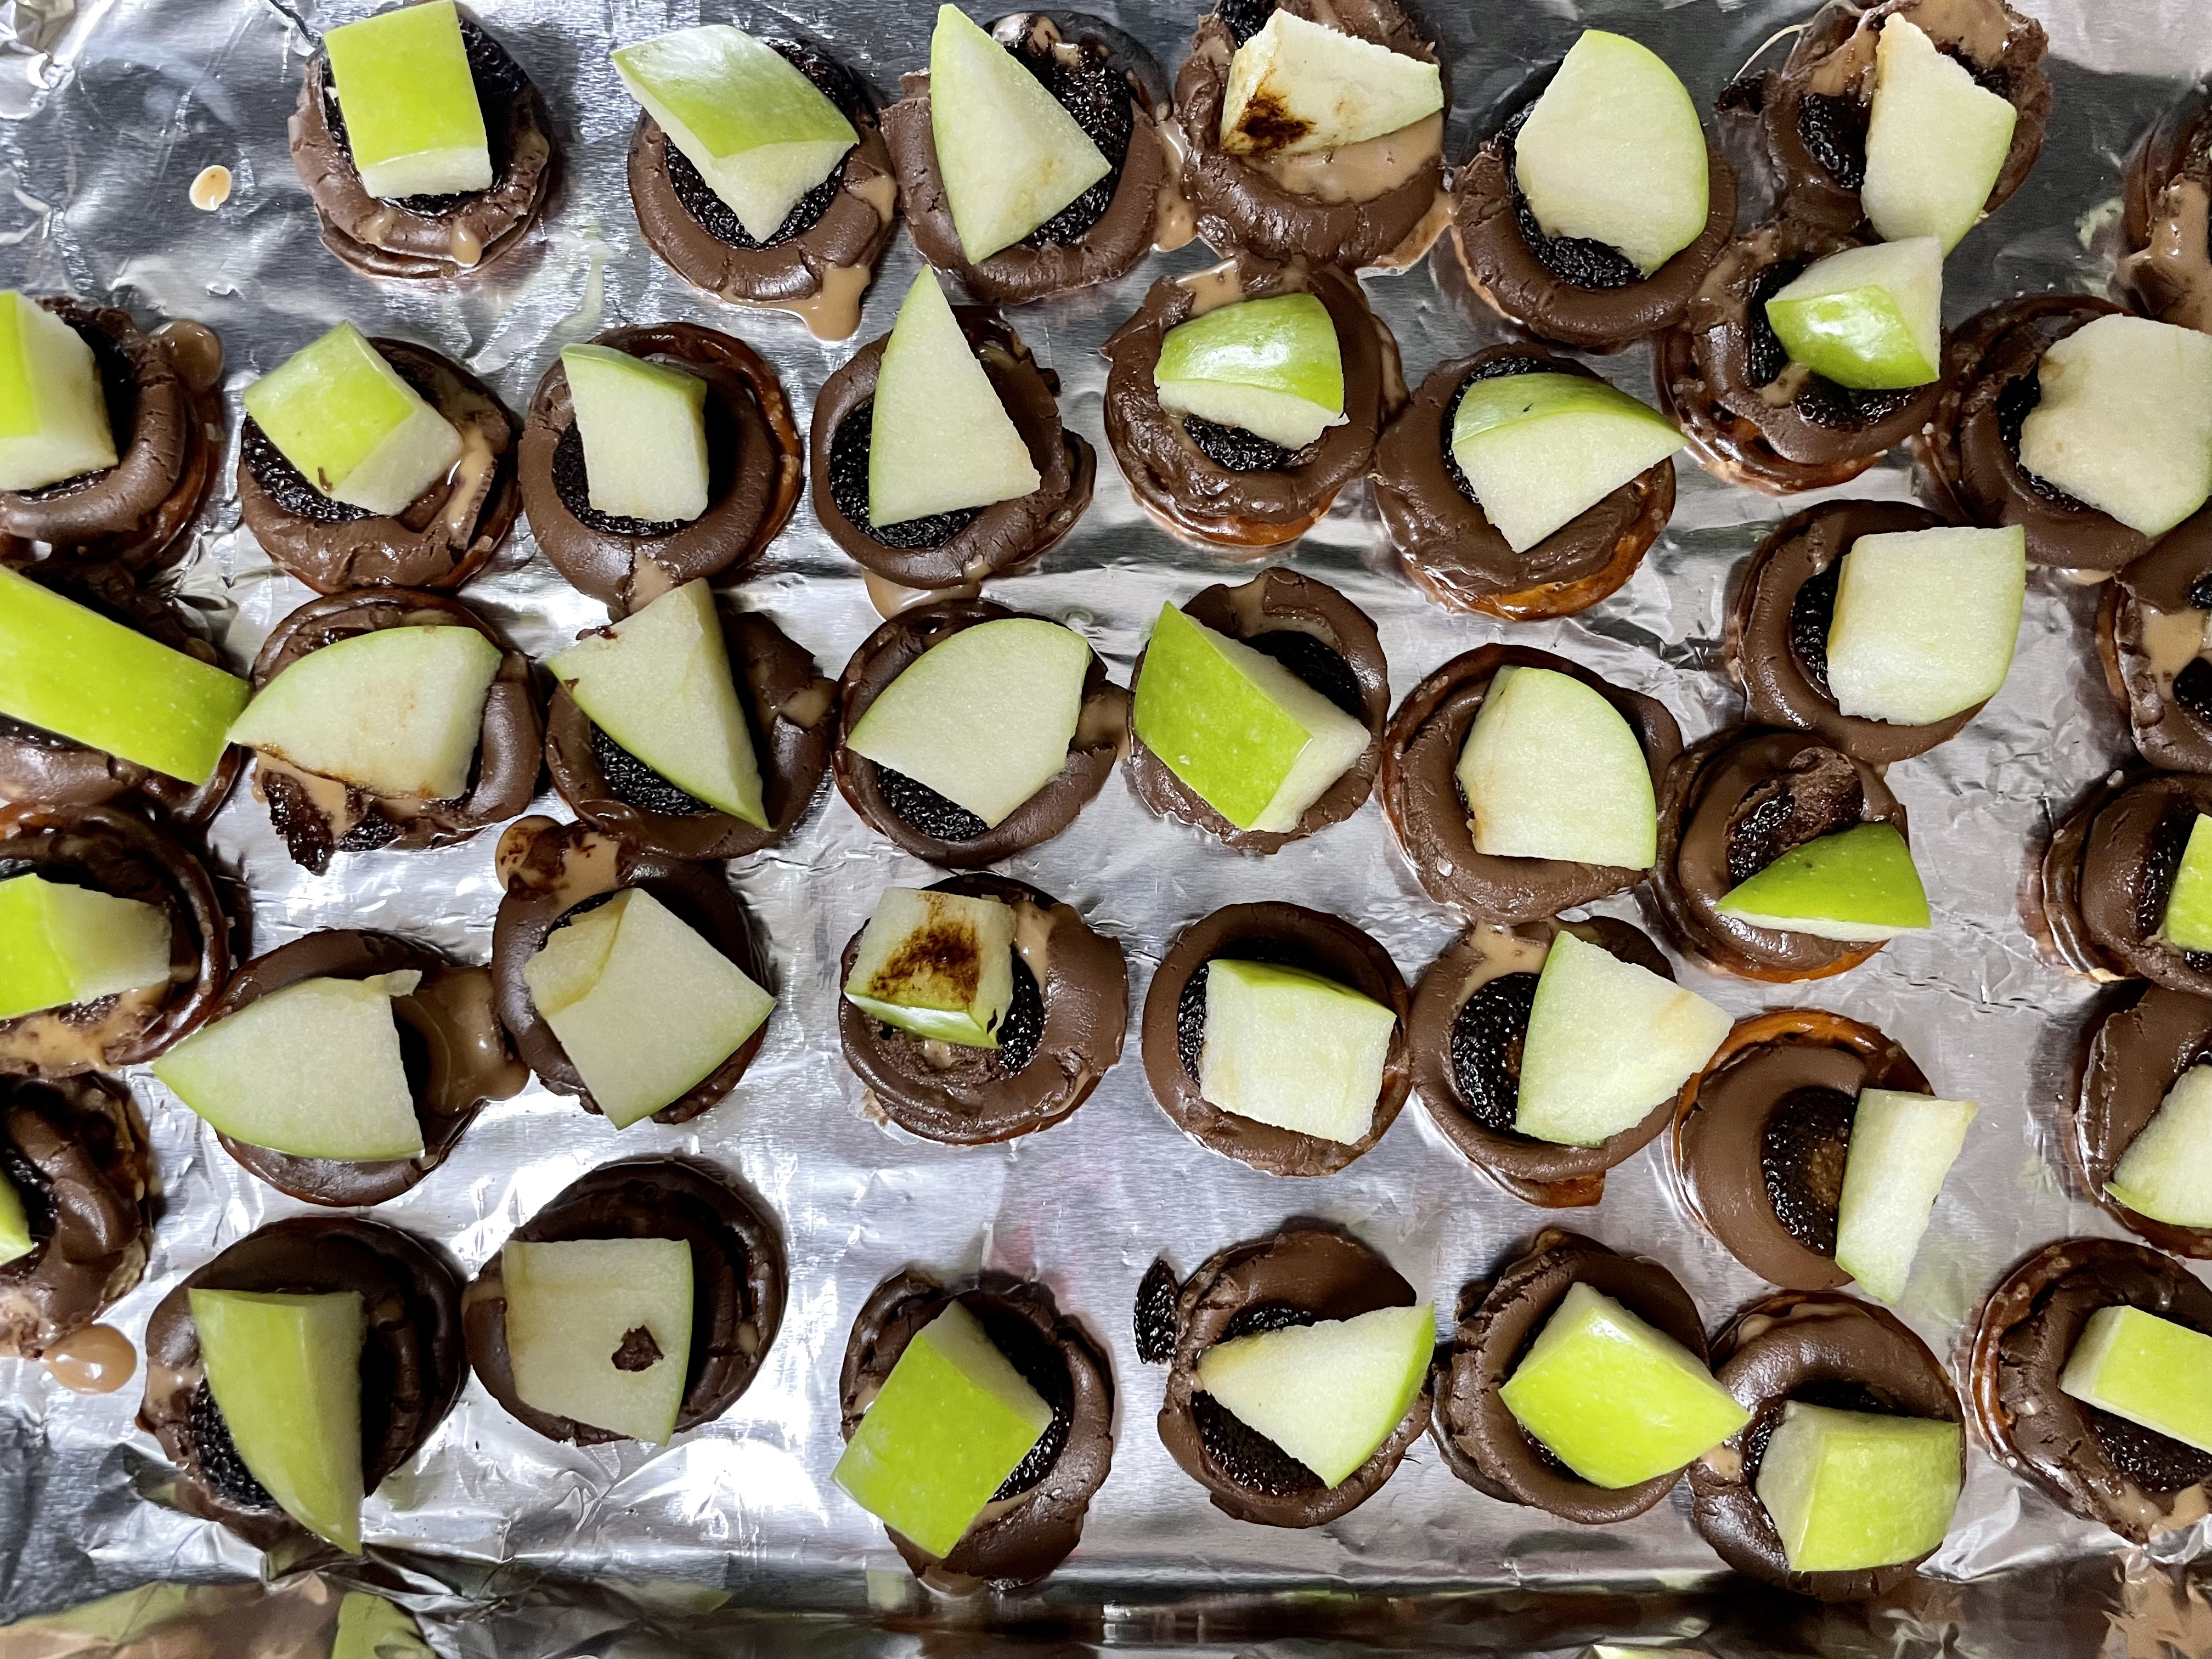
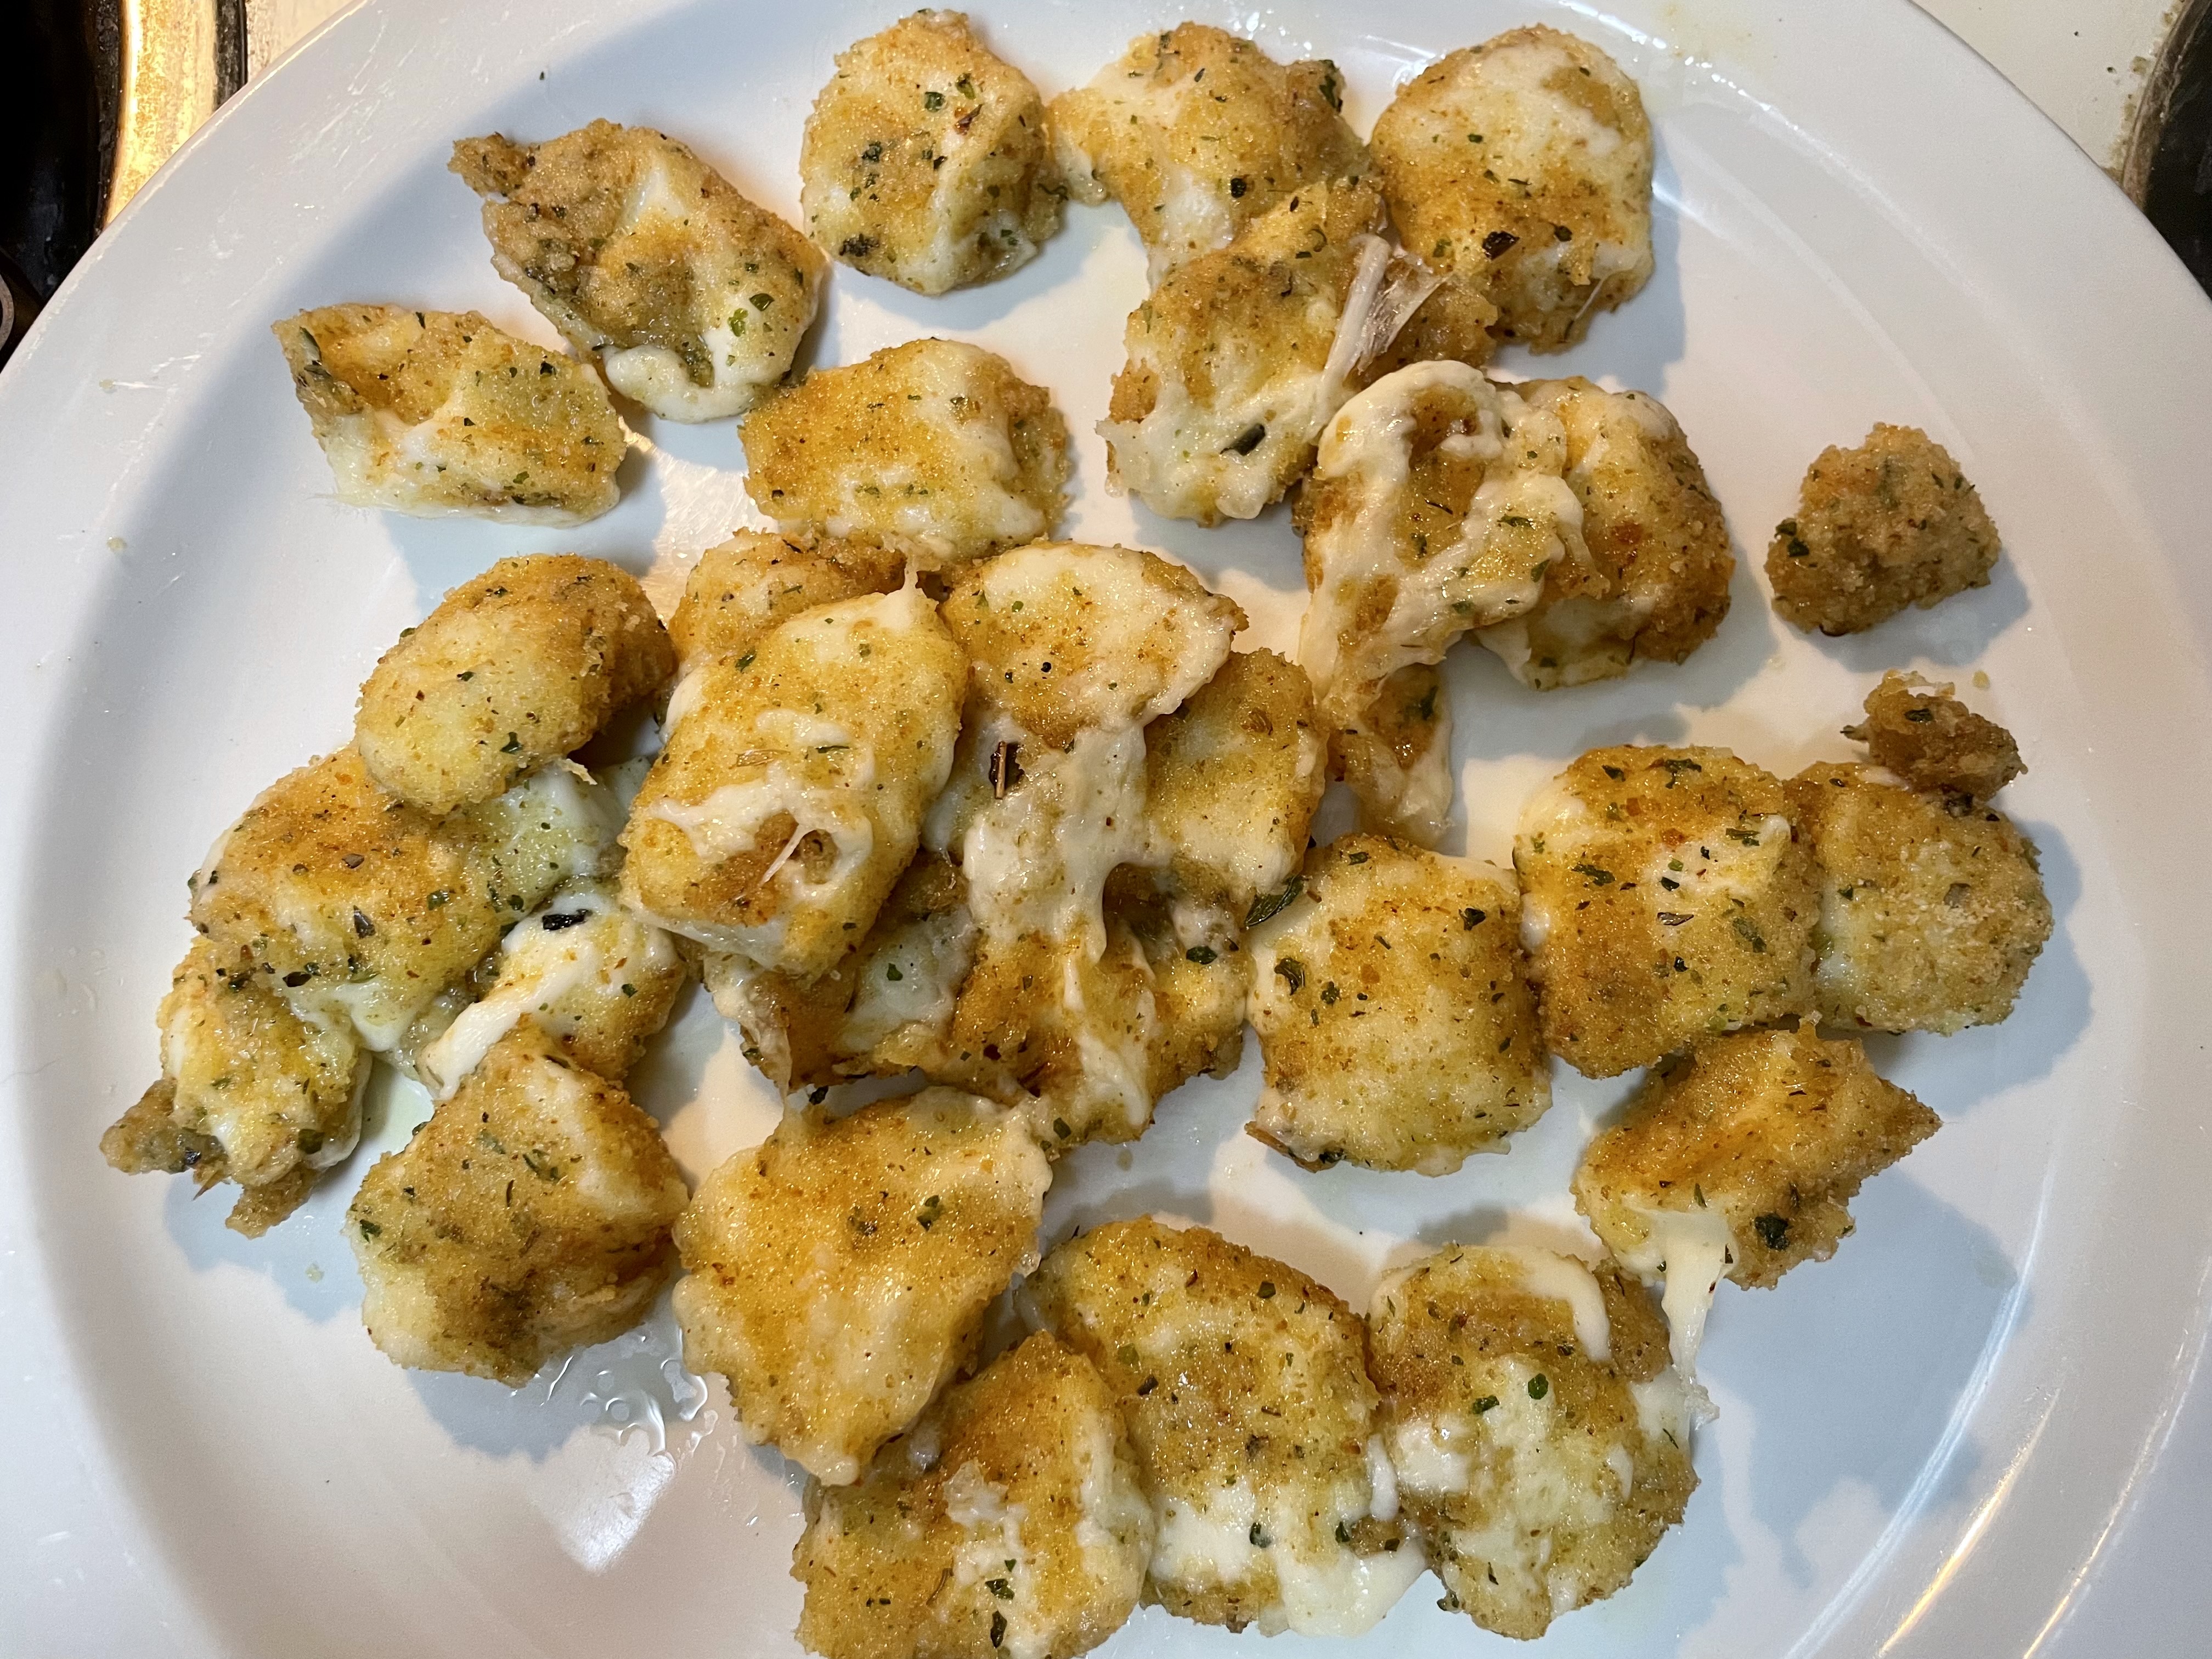
^^^ Very aware that my chocolate is a little burnt lolol -_-

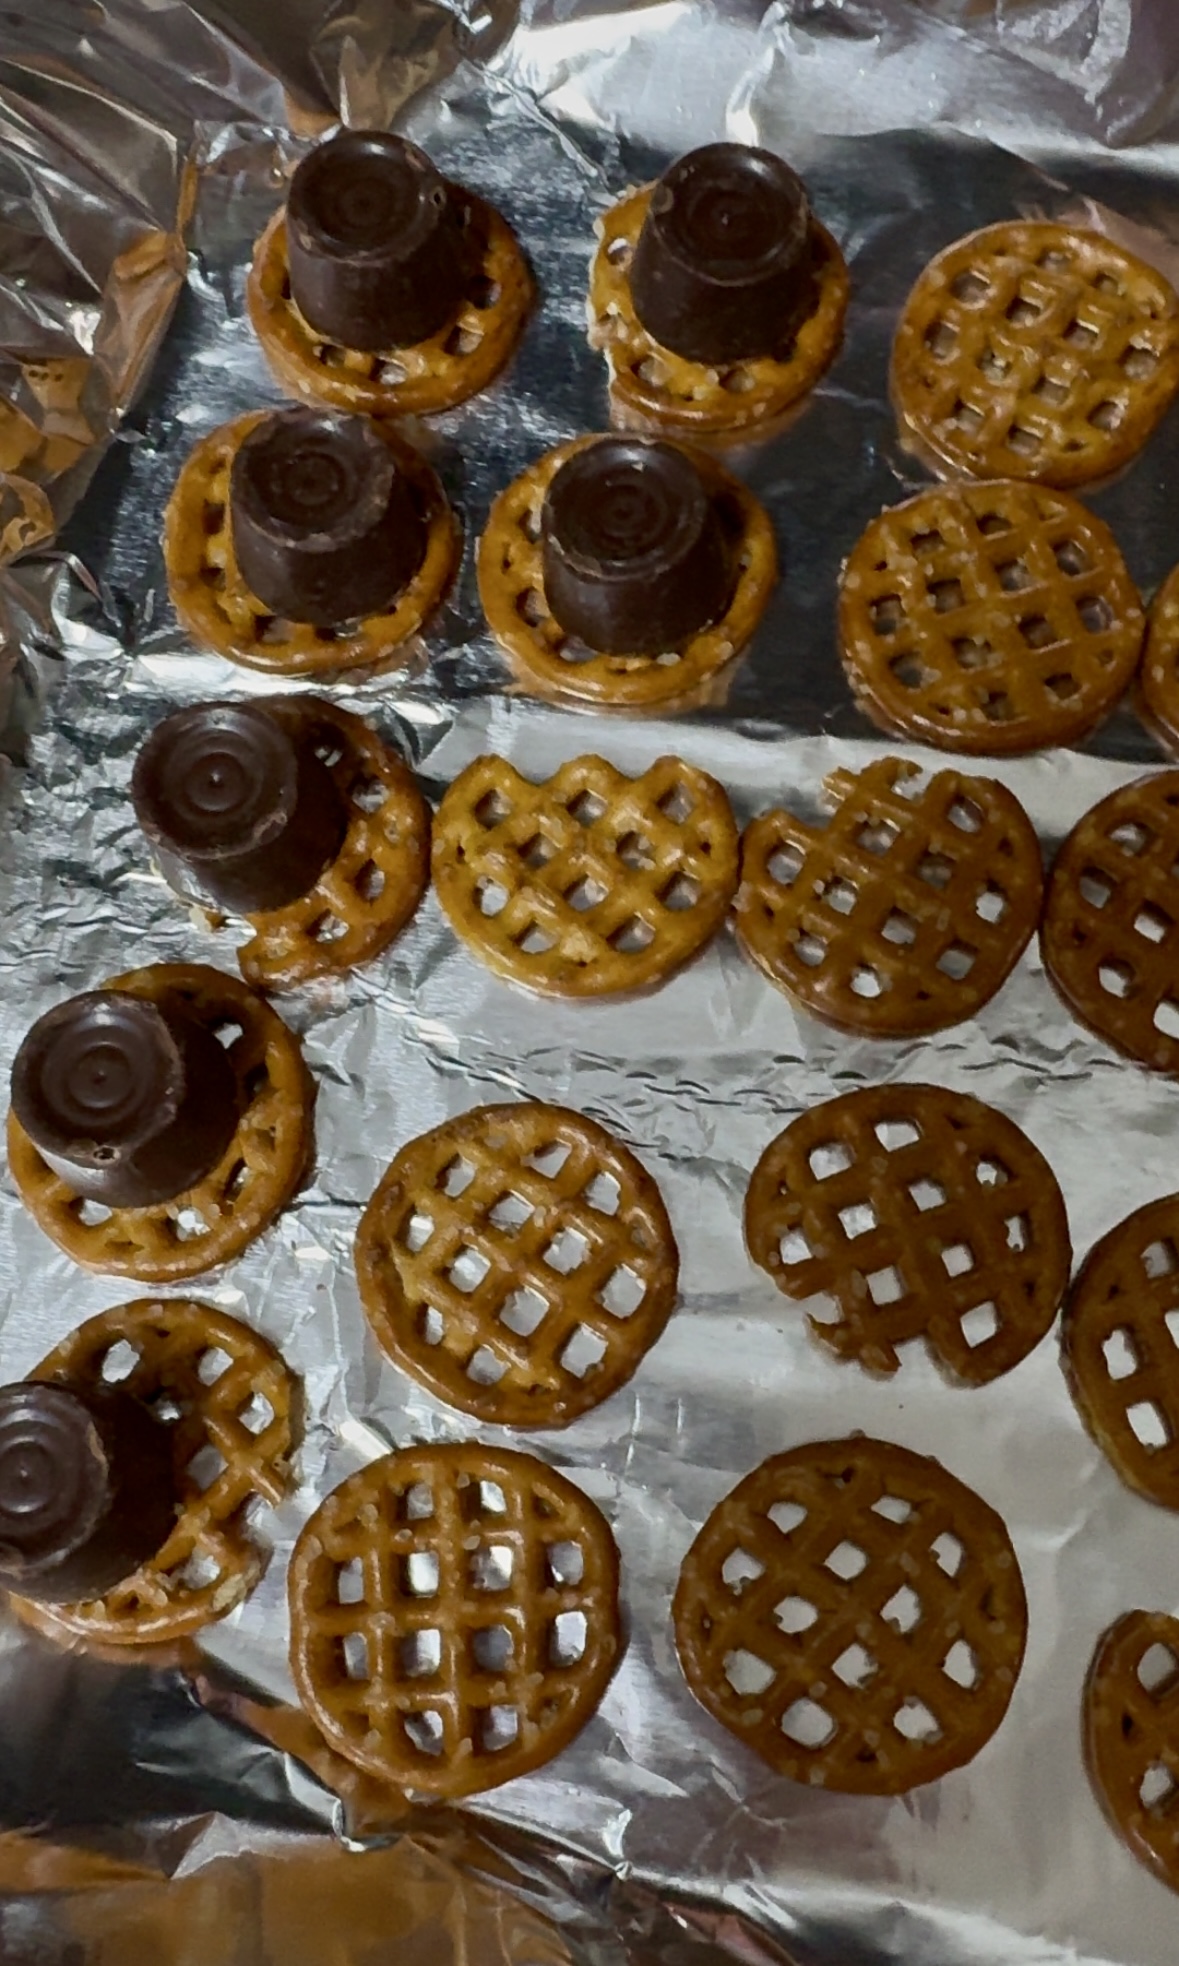
The Caramel Apple Bites required round pretzels, Rolos, and Granny Smith Apples and all you had to do was stack them! To start, I covered a baking pan with aluminum foil and placed my pretzels in orderly lines. The next step was the most annoying one because I didn’t realize that a bag of Rolos still came individually wrapped. I kind of assumed they wouldn’t be but you know that old saying about making assumptions! Unwrapping the Rolos was the most time consuming part of this process and I couldn’t resist snacking on a few of them and some salty pretzels as I unwrapped, and unwrapped, and unwrapped some more!

After the Rolos were on top of the pretzels, I stuck them in the oven but made the mistake of broiling them instead of baking them like the recipe called for. I kind of assumed it would have the same result but you know that old saying about making assumptions SMH! My chocolate did turn out a little burnt but it actually wasn’t a bad thing because it tasted like it was made over a campfire. Once the pretzel/Rolo combo was out of the oven, I topped each one with a piece of apple and put them in the fridge to cool down.

The end result of this treat was absolutely delightful despite the burnt parts. The salt of the pretzels were complimented with creamy and smooth chocolate and caramel. This would have been delish on its own but the Granny Smith Apples created the perfect bite. It added some crispness, juice, and a slight tartness for an explosion of flavor. These were a home run and I can’t wait to make some more and, yes, I will be baking them this time!

If you are looking for a quick and easy fall treat, this is the recipe for you. It will be fabulous for Halloween parties, bonfires, or an after school snack. Highly recommend!

Have you made any new recipes recently? How did they turn out? I want to hear from all of you, so leave me a comment and let’s chat! Much love. -Sarah

4 Easy Meals You Can Prepare If You Love Coffee

Standard
4 Easy Meals You Can Prepare If You Love Coffee

Coffee is more than just a drink, it’s a lifestyle. For coffee enthusiasts, the bold flavors and aromatic profiles of coffee extend far beyond the mug. If you’re someone who loves coffee, why not incorporate it into your meals? Coffee can add depth to dishes, creating savory, sweet, or even smoky notes that elevate your culinary game. Whether you’re a busy professional or a home chef exploring new tastes, here are some easy meals you can prepare using coffee as a star ingredient:

For a savory meal that highlights coffee’s robust flavor, try a coffee-rubbed steak. This dish is quick to prepare and will impress even the pickiest eaters:

Ingredients:

  • 2 steaks (ribeye or sirloin work well)
  • 2 tablespoons ground coffee
  • 1 tablespoon brown sugar
  • 1 teaspoon smoked paprika
  • 1 teaspoon garlic powder
  • Salt and pepper to taste

Instructions:

  1. Combine the ground coffee, brown sugar, smoked paprika, garlic powder, salt, and pepper in a bowl.
  2. Rub the mixture generously over both sides of the steak.
  3. Let the steak rest for 15 minutes to absorb the flavors.
  4. Heat a skillet or grill pan over medium-high heat. Cook the steaks for about 3-5 minutes per side, depending on your preference.
  5. Let the steak rest for 5 minutes before slicing and serving.

For breakfast enthusiasts, a coffee-infused syrup is a game changer. It pairs beautifully with pancakes, waffles, or even French toast:

Ingredients:

Instructions:

  1. In a small saucepan, combine brewed coffee and sugar. Bring the mixture to a gentle boil over medium heat, stirring until the sugar dissolves.
  2. Lower the heat and simmer for 10-15 minutes, allowing the syrup to thicken slightly.
  3. Remove from heat and stir in vanilla extract.
  4. Let the syrup cool before serving. It can be stored in an airtight container in the fridge for up to a week.

Coffee’s earthy flavors work wonders as a marinade, especially for chicken. This recipe creates a tender and flavorful dish that’s perfect for dinner:

Ingredients:

  • 2 cups brewed coffee (cooled)
  • 1/4 cup soy sauce
  • 1/4 cup olive oil
  • 2 tablespoons honey
  • 1 teaspoon ground cumin
  • 2 garlic cloves, minced
  • 4 boneless, skinless chicken breasts

Instructions:

  1. In a bowl, whisk together brewed coffee, soy sauce, olive oil, honey, cumin, and garlic.
  2. Place the chicken breasts in a resealable plastic bag or a shallow dish and pour the marinade over them. Ensure the chicken is fully coated.
  3. Refrigerate for at least 2 hours (or overnight for a more intense flavor).
  4. Preheat your grill or oven to 375°F. Grill or bake the chicken until fully cooked, about 25-30 minutes.

Need a quick snack to power through your day? These no-bake energy bites are easy to make and combine coffee with chocolate for a delightful pick-me-up:

Ingredients:

  • 1 cup rolled oats
  • 1/4 cup ground coffee
  • 1/3 cup honey or maple syrup
  • 1/3 cup peanut butter or almond butter
  • 1/4 cup dark chocolate chips
  • 1/2 teaspoon vanilla extract

Instructions:

  1. In a large bowl, mix all the ingredients until well combined.
  2. Roll the mixture into small balls, about 1 inch in diameter.
  3. Place the bites on a parchment-lined baking sheet and refrigerate for 1-2 hours until firm.
  4. Store in an airtight container in the fridge for up to a week.
  • Use freshly brewed coffee or high-quality ground coffee for the best flavor.
  • When incorporating coffee grounds into recipes, ensure they’re finely ground. Using a coffee grinder brush can help keep your grinder clean and ensure no old coffee residue affects your dishes.
  • Experiment with different roasts. Light roasts bring bright, acidic notes, while dark roasts add rich, smoky undertones.

Coffee isn’t just for drinking – it’s a versatile ingredient that can transform your meals. Try one of these easy meals and bring the bold essence of coffee into your kitchen!

Featured Image By: Unsplash

Subway Taste Alike Sandwiches

Standard
Subway Taste Alike Sandwiches

Hello!! I absolutely love a taste alike recipe and enjoy making lots of dishes that closely mimic mine and Johnny’s favorite eateries. It was pretty slim pickings in our apartment for a while but I was finally able to put in a curbside order to pick up over the weekend. One dinner I got the ingredients for was to make what is perhaps the easiest taste alike ever – Subway sandwiches. I couldn’t wait to make them because I had no idea until very recently that Subway sold some of their signature dressings at the grocery store! These sandwiches were a huge hit for me and Johnny and I also mean that they were huge lol. Check it out:

IMG_0834IMG_0833IMG_0836IMG_0835IMG_0837

As I placed my curbside order at Walmart, I got all of mine and Johnny’s go to fixings on our Subway sandwiches as well as two bakery loaves of Italian bread. The picture online looked pretty small so I ordered two just to be safe. I definitely could have gotten away with just one loaf because you could imagine my surprise when Johnny brought our groceries home and the loaves were the size of baseball bats! This was honestly a happy accident because we had plenty of leftovers for lunch and dinner the following day. 😀

Before we toasted our subs, I cut up all of the veggies to have them ready for assembly. I chopped green peppers, cucumber, red onion, peperoncini peppers, and olives and got bagged iceberg lettuce, spinach, and a jar of pickles too. This was the most time consuming part of the process, but once it was done all we did was take turns toasting the subs, put them together, and enjoy. As we assembled our meal, we had to laugh because the sandwiches were gigantic. They literally looked like what Scooby and Shaggy would eat in Scooby Doo. Mine was particularly sizable because of all of the veggies and I was full from just one quarter of the sandwich. My eyes might have been way bigger than my stomach, but I’ll be damned if it didn’t taste like Subway with every bite!

The Taste Alike Subway Sandwiches will, without a doubt, be made again. The only change I will be making is using smaller loaves of bread!!

Do you have a favorite taste alike recipe? What is your favorite chain restaurant? I want to hear from all of you, so leave me a comment and let’s chat! Much love. -Sarah

Fried String Cheese Bites

Standard
Fried String Cheese Bites

Hello!!! I don’t know about all of you, but I am feeling so refreshed! I had a very restful three day weekend and sleeping in until nine in the morning every day was just what the doctor ordered. Normally on Sundays, Johnny and I tend to binge watch the day away to gather our strength for the week ahead. Don’t get me wrong, we still binge watched the day away lol, but I did manage to cook a little snack that I have been dying to try! The Fried String Cheese Bites I made thanks to Dancing Through The Rain’s recipe turned out as good as I was hoping they’d be:

image_50451457(7)image_50441217(10)

I was scrolling through Facebook when I saw this recipe and I was instantly intrigued. What can I say, it had me at “fried cheese”! Of course, this snack was also very appealing because it looked so darn easy to make and I had all of the ingredients minus the string cheese readily available. In fact, it used all of the same things that I needed to make fried mozzarella sandwiches a few weeks ago. This is always a high selling point to me because I can try something new with the supplies I already have!

Prepping the fried cheese bites was really easy. I set up a station to coat them in with three bowls. One for flour, a wash of milk and egg, and Italian bread crumbs. All that was left to do was coat the cut up string cheese in the flour, the wash, the crumbs, and fry them up. This was a bit of a time consuming process because I made thirty bites in total and was SO ready to be done afterwards lol. On the bright side, the bites took minimal time to fry (Thirty seconds, tops.) and they were fabulous. The bites tasted just like mini mozzarella sticks and I definitely plan on making them again.

One thing I plan on doing differently next time I make Fried String Cheese Bites is adding some more cayenne pepper, as per the recipe’s recommendation. What I put in was not enough and I think these would be even better with a bit of kick to them!

What is your favorite thing to snack on? Have you tried any new recipes recently? I want to hear from all of you, so leave me a comment and let’s chat! Much love. -Sarah

Fried Mozzarella Sandwiches

Standard
Fried Mozzarella Sandwiches

Hello!! This past week, I have been able to cook a lot and it has been awesome. Don’t get me wrong, I love a frozen pizza as much as the next person, but there is something about a home cooked meal for dinner that hits SO much harder. It is always exciting to go grocery shopping with Johnny because I like to find one new recipe to try out each time along with our tried and true favorites. I usually find inspiration on Pinterest and Facebook and while scrolling through The Book, I found a recipe for Fried Mozzarella Sandwiches by The Petitecook. This was something I knew that both Johnny and I would enjoy and I was dead on. They were the bomb.com! Check it out:

image_50393857(1)image_50445825(9)image_50415105(3)image_50403841(10)

When I am looking for meals to cook throughout the work week, I want something with minimal ingredients and prep time. This recipe had that in spades and required only eight ingredients (Most of which I already had) and took about twenty minutes to make. You just can’t beat that! The process was simple and the end result was delicious. All that needed done was to coat the sandwiches in flour, dip them into a wash of egg and milk, coat in breadcrumbs, and fry up in oil. Easy peasy lemon squeezie!

These sandwiches tasted exactly like a gigantic mozzarella stick and Johnny and I were SO there for it. They were ooey gooey from the huge slices of buffalo mozzarella and crisped to perfection on the outside. This was an incredibly filling meal too – I couldn’t even finish mine!! As soon as we were done eating, Johnny declared that he wanted me to make them again, making it a great success. While Johnny opted to have his plain, I made mine with pesto and sun dried tomatoes. Next time I make them, I plan on doing fresh tomato slices, basil, and a balsamic glaze for me. I can’t wait to try it. 😀

The Fried Mozzarella Sandwich (compliments of The Petitecook) was a true game changer in my dinner roster. It is a tasty take on a classic grilled cheese and I highly recommend it!

Have you tried any new recipes recently? How did it turn out? I want to hear from all of you, so leave me a comment and let’s chat! Much love. -Sarah

Cacio E Pepe Baked Gnocchi

Standard
Cacio E Pepe Baked Gnocchi

Hellooooo! Johnny and I finally went grocery shopping and it couldn’t have come a moment too soon. We had literally nothing to eat at the apartment and there were several Pinterest recipes that I have been dying to try – one of which being a Cacio E Pepe Baked Gnocchi by Simply Delicious. I am pleased to report that it turned out amazing and both myself and my picky eater husband absolutely loved it. This recipe had minimal ingredients, took under an hour to make, and allowed for plenty of leftovers too. Check it out:

image_50414081(7)image_50727937(3)image_50761217(1)image_50740737(8)image_50450945(7)

When it comes to cooking during the work week, it is a must for the recipes to be easy peasy. While I really enjoy cooking, I really enjoy relaxing after a long day too lol. The Cacio E Pepe recipe by Simply Delicious was extremely straight forward. All I did was cook the gnocchi, prepare the sauce, stick it in the oven for fifteen minutes and dinner was served. There were no crazy techniques or a litany of ingredients involved and that is something I appreciate. Although I am a great cook, I am definitely no Master Chef!

Speaking of ingredients, there were only ten needed to prepare this dish. The beauty of this recipe is that a majority of the ingredients are things that you more than likely already have. The only items I needed to purchase was the milk, cream, and gnocchi. Not only was the recipe completely new to me, but it included an ingredient that is new to me too – cream!

I have never made a recipe that called for cream and even if it did, I probably would have used milk because that’s what my mom would do. However, I decided to go all out for this dish and use the cream and calories be damned lol. I am so glad that I did because I don’t think the end result would be the same without it. My baked gnocchi turned out divine. It was incredibly rich and just one serving filled me up. Despite it being a short lived meal, each bite was heavenly. The sauce was so bold and flavorful, the gnocchi was tender, and it is one of my favorite things that I have ever made.

As per both mine and Johnny’s request, I will one thousand percent be making the Cacio E Pepe Baked Gnocchi again. Huge shout out to Simply Delicious as the mastermind behind this dish!

What is your favorite kind of pasta? What do you normally cook during the work week? I want to hear from all of you, so leave me a comment and let’s chat! Much love. -Sarah

Easy Halloween Wreath

Standard
Easy Halloween Wreath

Hello! I love hosting guest bloggers on lifewithlilred, especially during the change of the seasons. It is so much fun to see how my friends and readers from all over the world welcome and celebrate different seasons and the holidays that come with it. I was SO excited to see this past week that one of my darling friends, Rachael, the mastermind behind the fabulous blog, And Fierce, responded to my guest bloggers call to action. She is so fantastic so do give her page some love! Today, we are going to check out an Easy Halloween Wreath that she created and check back in tomorrow for her recipe for pumpkin milkshakes. Yum! Let’s get to it:

Easy Halloween Wreath

Compliments of Rachael from And Fierce

As a Halloween lover, it is extremely hard not to buy everything in the store right when I see it. I think I speak for everyone when I say, it is easier to throw something in your cart and buy it than it is to curate something yourself. I made Winter’s first two Halloween costumes and this year I bought hers. I could’ve made it but I didn’t really have the patience for it this year.

So somehow I’ve had the time to make two Halloween wreaths??

Okay, so, what happened was, I had been slowly putting together sticks from our yard to make this wreath that I kind of came up with in my head. I was feeling myself because of how it turned out. I put in all the time to do it all and plan it out. But I guess it wasn’t as sturdy as I thought. It didn’t take long until it fell off the door. At that point, it was an easy fix. I laid it on the floor in the kitchen to fix later. But I waited too long, because Winter decided that she needed to walk through that area that no one ever walks through. So needless to say, the whole thing was trash at that point. I did take a few things from it to use again.

Here is what the first one looked like…

Screenshot 2023-10-02 at 06-23-22 picsart_10-21-01.02.26.jpg (JPEG Image 1982 × 1982 pixels) — Scaled (36%)

I do like the new one better though. It just feels a bit more lively for the season. I just love orange and black for Halloween too!

You could totally make this in a couple hours, if you are uninterrupted… *ahem* kids.

Supplies

12 inch Wreath Wire

2 spools of 6 inch Tulle, 25 yards (1 black, 1 orange)*

Felt Bat

Fake Black Peonies

Hot Glue Gun & Glue Sticks

Fishing Wire

Ribbon

Instructions:

First thing you want to do is get your tulle ready and cut. I just used the wire wreath as a guide and cut about 12 inch pieces. I cut the whole roll of each and used almost the whole spool.

Next, start adding the tulle to the wreath wire. I took a section of tulle and folded it the long way and then folded it again to loop it on the wire.

Screenshot 2023-10-02 at 06-23-39 picsart_10-21-01.04.57.jpg (JPEG Image 1080 × 1080 pixels) — Scaled (67%)

Notice the direction I did the tulle. I added it from the inside out, if that makes sense. This way it stayed better and it made it lay nice and flat.

I kept it simple by adding evenly to each section just so I didn’t get ahead of myself and have to go back and fix sections.

I then started to get into a groove and this is how I patterned the pieces to try and keep it all even.

Screenshot 2023-10-02 at 06-23-57 picsart_10-21-01.06.09.jpg (JPEG Image 1982 × 2643 pixels) — Scaled (27%)

After I continued and made each section the same, I went back and added tulle pieces where I felt it needed it. Or if you feel like you want yours to be fuller, go ahead and add more. *Also depending on how full you want it to look, you may need more tulle.

Once I got it looking how I wanted, I hot glued the leaves of the peonies. Then I added on the peonies. Next, I looped the fishing wire to add the bat to hang in the middle of the wreath. I also eyeballed the length and used hot glue and cut any excess.

Screenshot 2023-10-02 at 06-24-08 picsart_10-21-01.10.14.jpg (JPEG Image 1080 × 1080 pixels) — Scaled (67%)

I then took my ribbon and looped it through the top of the wreath, on the first wire. I just tied a tight knot and cut any excess.

Screenshot 2023-10-02 at 06-24-20 picsart_10-21-01.11.30.jpg (JPEG Image 1982 × 2643 pixels) — Scaled (27%)

I am obsessed! As you can see, I did copy my original wreath with the same feel, but this one is the mic drop. It’s so pretty and I’m so happy I have it hanging on my door!!

Screenshot 2023-10-02 at 06-24-35 picsart_10-21-01.00.06.jpg (JPEG Image 1982 × 2643 pixels) — Scaled (27%)

How amazing is that wreath?! Rachael absolutely rocked it! For more from this lovely guest blogger, give Rachael a follow on Instagram: @kavebabe, check out her blog, and visit lifewithlilred tomorrow for her pumpkin milkshake recipe. Thanks again, boo! ❤

Do you like to make your own seasonal decorations? What is your favorite holiday to decorate for? I want to hear from all of you, so leave me a comment and let’s chat! Much love. -Sarah

Creating An Outdoor Oasis In A Limited Space

Standard
Creating An Outdoor Oasis In A Limited Space

Imagine stepping outside into your small yard, and instead of feeling cramped, you feel transported into an idyllic green retreat. A real escape from everyday stressors awaiting just outside your door. Now that’s what we call an outdoor oasis! Having a small yard may feel like creating any sort of garden retreat is impossible. But don’t despair; we’re here to help make it so. Let’s get started:

Examine Your Space:

First and foremost, let’s get an accurate lay of the land. So get out your tape measure and get crackin’. Don’t get carried away with size. What really counts most is what you do with what you’ve got. Make sure to take note of any quirks or limitations such as an oddly placed tree stump or pesky AC unit when measuring. This will make designing much more straightforward.

Establish Your Goals:

Close your eyes (but keep reading!) and imagine how you’d use your outdoor oasis in an ideal world. Would it be relaxing with an icy lemonade on a bright afternoon or hosting some barbecue festivities with friends? Do you want it full of useful storage barns and sheds? Whatever floats your boat, write it down, and we can get this vision underway!

The Right Elements:

Now that you know what you want and how it will fit into the space, it’s time to put together your outdoor paradise. For something a bit different, think vertical. Vertical gardens, wall hanging, and even trellises all add dimension and make any area appear less dull in an instant. Use every bit of available space efficiently. Soon your yard will transform from drab to fabulous in no time at all.

Optimizing Greenery:

Scatter greenery across your space like confetti. Combine different plants and flowers together for an eye-catching yet relaxing atmosphere. Add plants in a way that optimizes your space. Got a lot of shade? Opt for shade-loving greenery. Don’t want to spend a lot of time caring for plants? Choose a low maintenance garden. There’s no point installing things that won’t thrive.

Creative Storage:

Looking for a place to stash your tools? No worries. Creative storage solutions have got this covered. Build benches with hidden compartments, purchase ottomans with built-in storage, or simply hang shelves creatively to store all that clutter away for good.

Strategic Lighting:

Let there be light! And not just any old light. Imagine starry-night hues from string lights and fairy lights all the way to solar-powered lanterns illuminating your outdoor oasis after sundown! If you’re really looking to create an atmosphere, investing in LED landscape lighting installation can be transformative to your property. Let the lights sparkle like diamonds during every evening stroll and you’ll have a truly magical space.

Design for Comfort:

Comfort reigns supreme here. Grab some luxurious cushions, create an intimate corner with a hammock, or add some swings for added zen-like vibe. And don’t forget about shade when the sun makes its appearances. Keep yourself cool with pergolas or stylish umbrellas.

Your small backyard has now transformed into an incredible outdoor retreat filled with charm and personality. Enjoy it!

Featured Image By: Kanu Jacobson / Pexels

Homemade Rose Oil

Standard
Homemade Rose Oil

Hello!!!! Way back in the day, I used to really enjoy making homemade bath and body care like scrubs, shower gels, and lip balms. It has been SO long since I have done that but it was always a blast! This past week, I decided to revisit one of my old hobbies by making some rose oil with petals from a gorgeous bouquet at my mom and dad’s house. It was insanely easy and, even though I wasn’t too fond of the smell, it was an amazing addition to my bubble bath. No thanks to the bath fizzy from Bath & Body Works that you all read about yesterday! Let’s get to it:

image_50441985(6)

Step By Step:

I made my rose oil by following directions from a surprising source – an article posted by HGTV! Directions for making rose water were also included and I might try that next with the remaining flowers from the bouquet I used. A rose oil concoction went a little something like this:

Step One: Tear or shred your petals. For mine, I took several at a time and tore them in half.

image_50443009(5)

Step Two: Pour a cup of oil into a jar with the petals. Jojoba and grapeseed oil were recommended, but I didn’t have any. However, they mentioned that olive oil would work well too so that is what I used.

image_50739201(3)

Step Three: Bring a few inches of water to a raging boil and remove from heat. Place your jar of oil and petals in afterwards until the water cools.

image_50440705(3)image_50373121(1)

Step Four: Place your jar in front of a sunny window and let it sit for 24 hours.

Step Five: The next day, remove your petals from the jar and squeeze out all of the oil you can from them. To do this, I started pouring the oil with the lid slightly on into another jar. Once a majority of the oil was removed, I used a spoon to press the petals and store the excess.

image_50412033(2)

Easy peasy, right?! Making homemade rose oil was a quick and fun project and I was really pleased with the results. I poured some of my rose oil in the bath tub and it was so lux and lovely. Yes, it was a freaking pain to clean up the oil slick tub after my soak. BUT my skin felt fantastic and it still does several days later. I have noticed a huge difference in the softness of my skin and it feels nourished and healthy. I can’t wait to use it again during my next bath time self care sesh!

Concocting your own rose oil is a wonderful way to bring a second life to roses from your garden or a bouquet. Once again, you can view the directions that I followed here. Tune in tomorrow on lifewithlilred for more flowery vibes as we take a look at my first watercolor painting I have done in a minute!

What is your favorite flower? Do you like to make any crafts or bath and body care with flowers? I want to hear from all of you, so leave me a comment and let’s chat! Much love. -Sarah

Roasted Garlic Butter Parmesan Potatoes

Standard
Roasted Garlic Butter Parmesan Potatoes

Hello!! Memorial Day was the first week day that I have had off since the holiday season and it was wonderful! I caught up on paperwork, did very minimal other work, binge watched Top Shot with Johnny, and cooked up a storm. I cooked a few favorite recipes like mac n cheese and tried out something new by following Eatwell101’s recipe for Roasted Garlic Butter Parmesan Potatoes. While there were parts of this recipe I would change, Johnny freaking loved it so it was a GREAT SUCCESS in that regard! Check it out:

image_50449665(6)image_50753537(4)

This potato side dish recipe was insanely easy to make and took less than fifteen minutes of prep time to complete. All I had to do was chop the potatoes and garlic, melt some butter, and mix a few ingredients together for the sauce. Then, all that was left to do was pop it in the oven and wait. Even before I placed the dish in the oven, it smelled SO good and while it was cooking it smelled even better – our hungry selves were very eager to try it out!

As I said, Johnny was most pleased with the outcome of this recipe and asked me right away if I could make it again lol. That always makes me happy, regardless of if I liked it or not! I thought that the base of the recipe was great, but it wasn’t as flavorful as I had imagined it to be; especially considering the amount of garlic used and I even added some onion in for good measure. The next time I make this, I will be opting for fresh herbs (Which I didn’t have) as well as some lemon juice. I love lemon and Parmesan together and I think that it will help bring more of the flavors out that kind of got muddled.

As per Johnny’s request, I will be getting the ingredients for the Roasted Garlic Butter Parmesan Potatoes again for our next curbside order. I will also be getting my modification ingredients and am hoping it will be even better the next time around. This is a recipe worth trying and putting your own spin on too!

What is your favorite side dish? How did you spend Memorial Day? I want to hear from all of you, so leave me a comment and let’s chat! Much love. -Sarah