Helloooo everyone and happy Tuesday! Earlier this month I ordered a black beanie that had a fishnet veil attached to it off of Amazon. Unfortunately, when it came in the mail last week I discovered that the veil on the beanie was torn in two. I was so disappointed and when I emailed the vendor to request a return she was totally awesome. She gave me a refund on the product and I didn’t even have to send it back to her. Now I was stuck with a defective beanie that I had no clue what to do with. I pondered my options and came up with a solution to make something out of nothing and I am very happy with the results, as you can see from my featured image photo! Let’s discuss the simple steps that it took to make my new Vintage Style Hair Piece Craft:
Step 1) Acquire veil. In my case, all I had to do was cut the netting from the beanie. #SCORE
Step 2) Find a jewel, feather, hat, or whatever you would like to pin your veil to. The feather and jeweled piece that I used came from an old headband of mine that I wore when my hair was longer. The feathers were attached to a circular elastic band which I don’t care to wear because it makes my hair tuft up in the back. But that’s neither here nor there. #Idigress
Step 3) Pin your accessory to your netting. I used two bobby pins to secure my veil to the feathers. One to keep the items attached and one to clip in my hair when I wear it. I know it looks super janky in the pictures because you can so clearly see the bobby pins, but it’s not noticeable in the slightest when it’s in your hair. #pinkiepromise
^^^ Honestly, those directions were so unnecessary. Lol, you guys are all smart and I’m sure you could figure this craft out on your own. But maybe this post will come in handy to those who are not the craftiest, like myself. When I’m not looking a hot wreck, I’ll be sure to post some pictures of me rocking my fun new accessory! OH YOU CRAFTY HUH?!
So there you have it, the easy how to guide for a Vintage Style Hair Piece Craft. I am so pleased with the little spark of inspiration that I had to recycle old items and make them new again. I found an unexpected use for a headband that I haven’t worn in years and a defective purchase. Not bad! What is your favorite craft that you made from a recycled item? Have you made anything similar to my hair piece craft? I wanna hear from all of you, so leave me a comment and let’s chat! Much love. -Sarah
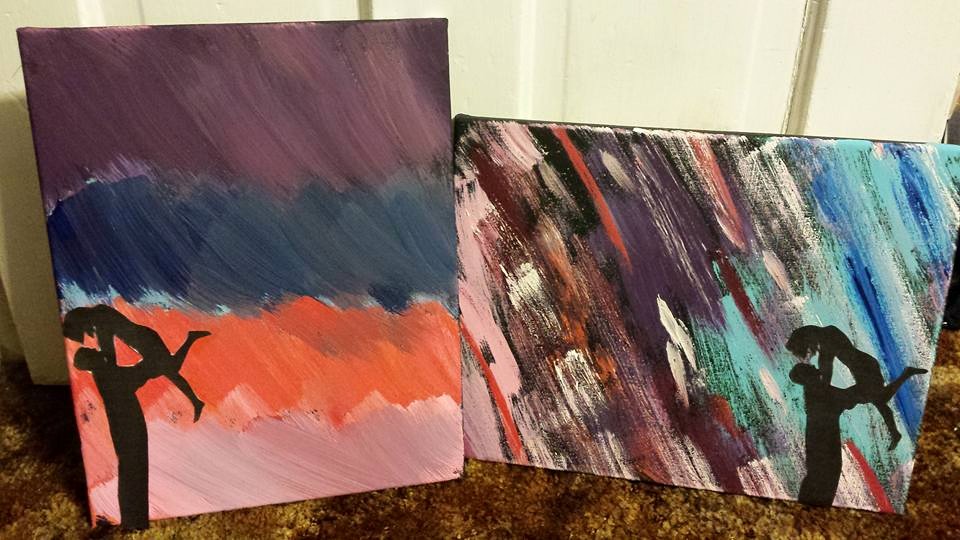
Howdy everyone and TGIF!! Omg guys I had the most fabulous night with my sweet best friend Lea yesterday! It was a terrific evening of crafting, eating hella Cheez-Its, and being straight up silly – it was perfection. The last time we hung out we tried making a canvas art craft of a night sky over looking a city silhouette….unfortunately we couldn’t get past painting our canvas black and dousing it with glitter so we called it a night. But last evening we were dedicated to making something pretty out of our black canvas, and this was our final result:
^^^ So adorable! Mine is the one on the left and Lea’s is obviously the one on the right! Here’s the step by step guide on how we made our cute canvas craft: #ohyoucraftyhuh
Step 1) Paint your canvas black. (Optional)
Step 2) Pour glitter all over your freshly painted canvas. (Optional)
Step 3) Cry. (Optional)
Step 4) Give up. (Optional)
Step 5) Try again! Lea and I decided to go balls to the wall with this craft so we just started painting over our glittery black canvas however we pleased. I was trying to go for a more sunset-y vibe…and I’m honestly not sure what vibe Lea was going for – but it turned out great!
Step 6) Find a silhouette picture on the computer of whatever you like and cut it out. Or if you’re an overachiever and can draw well, feel free to draw out a silhouette. Lea and I are both a big fan of the cutesy couple images, so that’s what we both opted for. But it really can be anything – a giraffe, a toilet, a bomb…it’s up to you!
Step 7) Glue on your silhouette and bask in the glory of your craftiness!
Throughout our evening Lea and I basically annihilated a bag of Cheez-Its – as you can see by my featured image photo, and it was the most fulfilling snacking experience I’ve ever had. So the answer is yes, there probably is Cheez-It residue all over my canvas. After we completed our craft, we spent the rest of our time together creeping on people on Facebook, laying in bed being silly, and making up quotes that historical figures and celebrities definitely didn’t say. For example, when we posted our picture of our craftiness on Facebook we captioned it with “A steady hand and a calm heart” – Elenore Roosevelt…..Okay – maybe it’s not that funny BUT it was SO funny to us!! I’m so happy that I got to have an evening off from drowning in homework to have some much needed girl time with my darling. We had such a blast and by the time I got home I felt rejuvenated enough to complete the rest of my work at the prime time of 11:30 at night! #dedication
I hope all of you guys are having an awesome day so far! What is everyone up to this weekend? What have you been crafting recently? I wanna hear from all of you, so leave me a comment and let’s chat! Much love. -Sarah
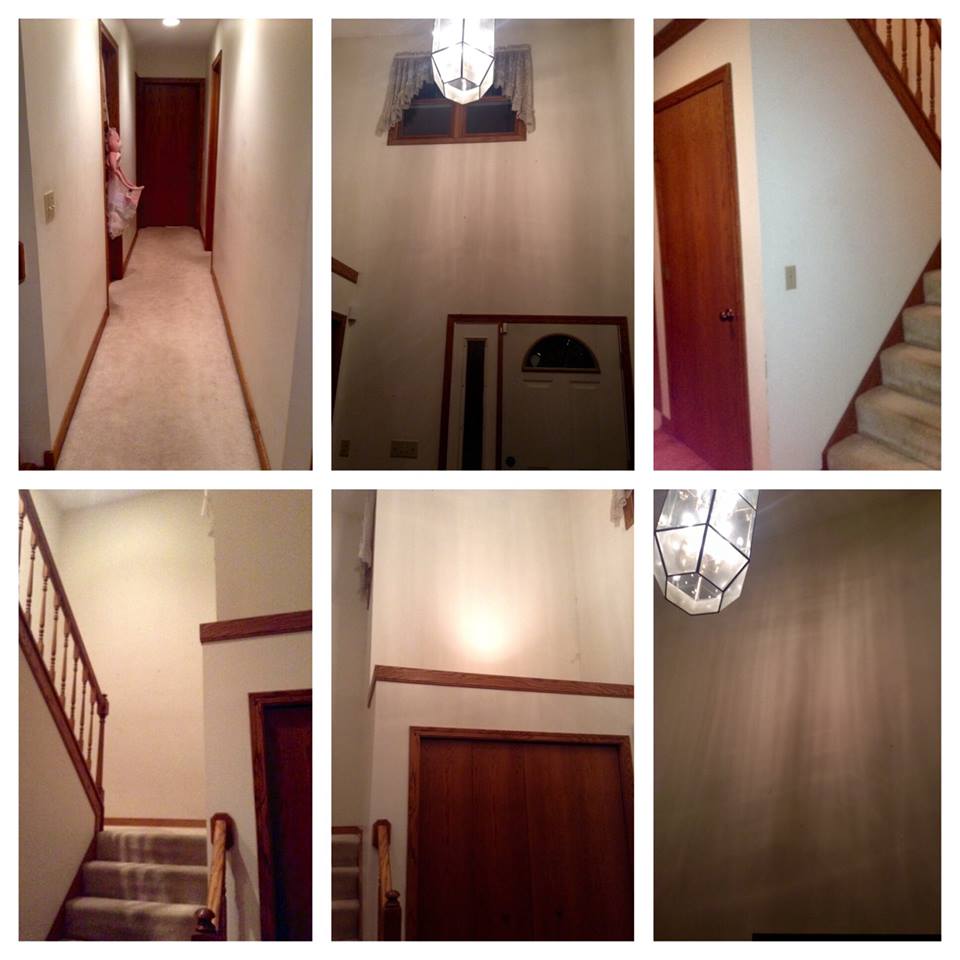
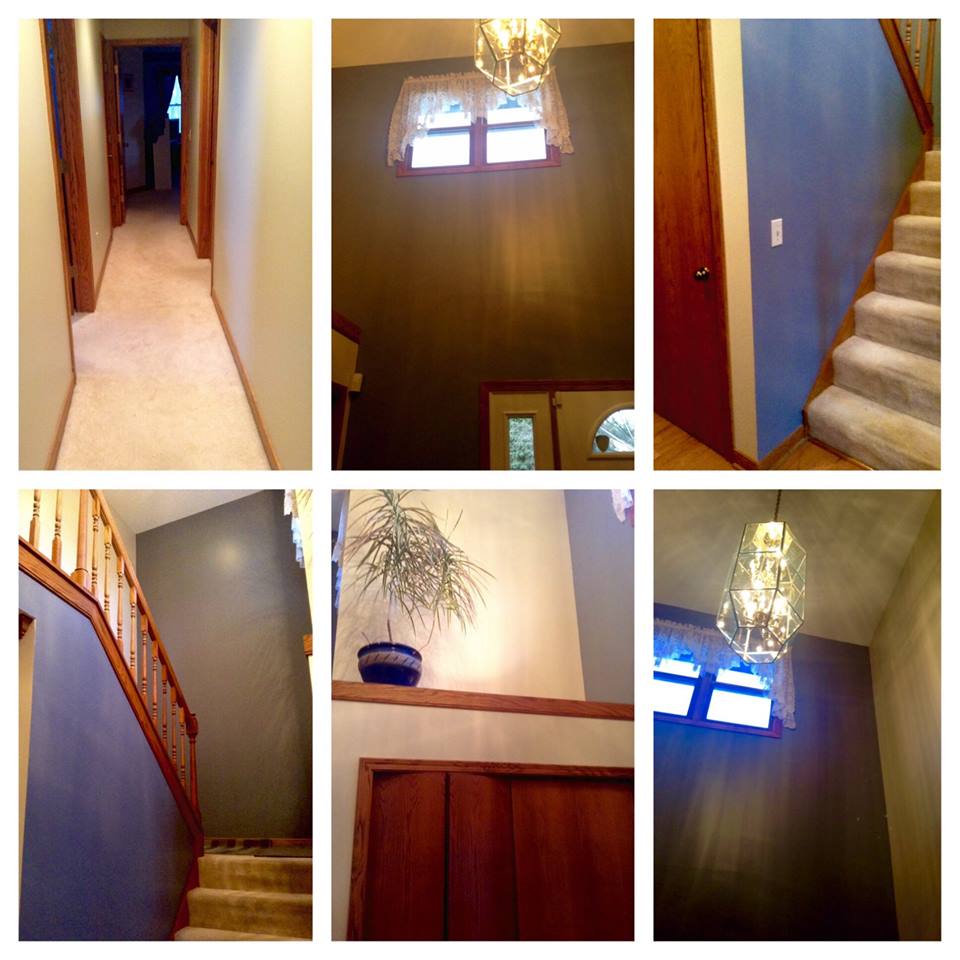
Hi hi hi hi hiiiiii. So tomorrow I planned on showing you guys what the new renovations on our hallway/entry way look like, but then I remembered that I’ll be out of office for most of the day so I figured I’ll just get it out of the way now! I mentioned earlier that we were getting our hallway and whatnot painted and the finished product looks SO fab and shockingly modern considering my dad came up with most of the ideas! Take a look at the before and after pics:
BEFORE:
AFTER:
I know that the lighting in these pictures isn’t the best, but you get the idea. Our faithful handyman who we go to for literally everything did such an amazing job. He spent the better part of this week painting, doing whatever else it is that he does, and making everything look perfect. I know you can’t really tell the color of the hallway in the very first picture on the PicStitch because it didn’t photograph very well, but it’s a sage green and it’s SO pretty. I’m really hoping that we can get some cool artwork to hang on the walls soon, because they’re looking super bare. But yes, being woken up early every morning by the handyman doing his thang was totally worth it, as you can see by the finished results!
^^^This has been my blogging soundtrack and I’m so obsessed it hurts. I love AWOLNATION too much and am so excited to listen to their new album in its entirety later tonight because I finally added it to my iTunes today!
Tomorrow my parents, my best friend Kate, and I are going to see Beauty & The Beast at Playhouse Square in Cleveland and I CANT WAIT!!!! I haven’t seen a musical in ages and shocking as it may be for some – I absolutely love them. It’s going to be so much fun and I’m really looking forward to telling you guys all about it, so make sure you keep it posted at lifewithlilred! I’ll try and get some pictures if I can!! ALSO, I have a really fun photo shoot planned on Sunday for some fresh new pics for the ol’ blog so make sure you come back and check them out! I’m not going to give the idea away completely, but I can tell you that the shoot revolves around my early birthday gift from my mom….a super adorable Betsey Johnson purse!! I live for Betsey Johnson’s quirky/girly/fun clothes and accessories so needless to say I’m beyond happy with my month and a half early gift! :))))
I hope all of you are having a terrific Friday night! I’m actually about to go watch The Theory of Everything again with my parents. They didn’t watch it with me last week and the movie was so nice damn right I’ll watch it twice! Have any of you done any home renovations lately? How did they turn out? I want to hear from all of you, so leave me a comment and let’s chat! Goodnight. -Sarah
Helllllooo gang and TGIF! I don’t know about you guys, but I had a fabulous Thursday!! Seriously, I haven’t had such a lovely, average day in forever so I feel the need to share it! To get you in the great day spirit, enjoy this goofy Lonely Island video and proceed to read:
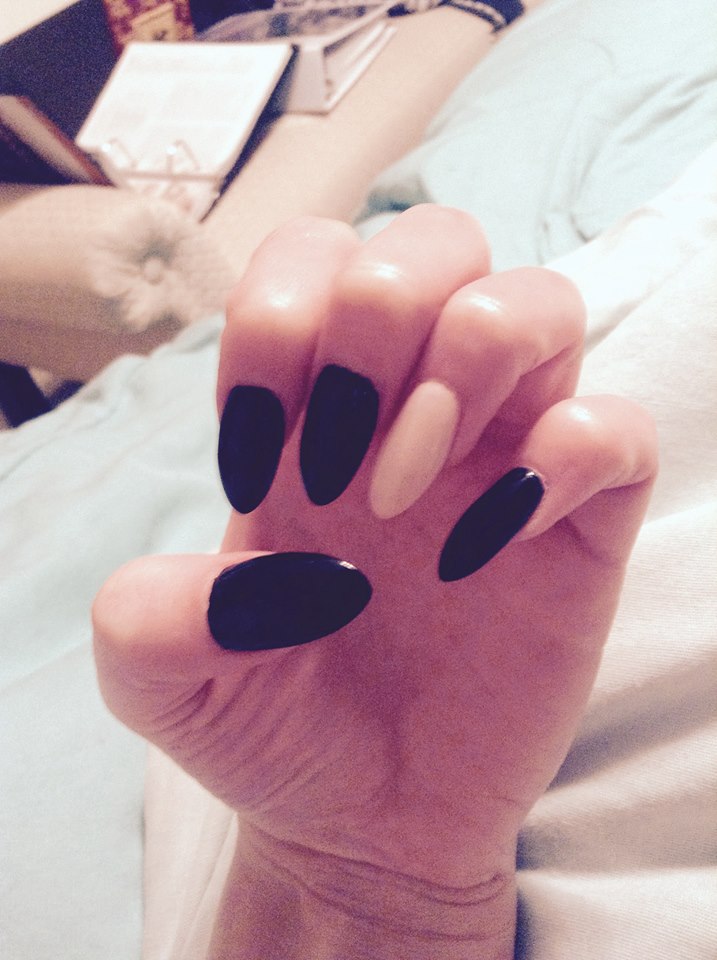
I had an early start today because I had to drive to Cleveland in the morning for stupid math class. My only complaint about my morning was the fact that we were out of coffee grounds at home, so I didn’t have enough to make my usual amount. I made the coffee anyway, keeping my fingers crossed that it would still taste good…but unfortunately that didn’t happen. -__- I was basically drinking slightly bitter bath water my entire way to school, lol it was so gross. Math class was boring as usual, and I totally left class early to go get my nails done…clearly I have my priorities straight. 😉 However, once I got on the highway there was a big fat traffic jam due to road construction so I ended up getting to the salon when I would get there on a normal day without leaving early. So moral of the story: I should have just stayed in class. Ha! BUT, my beloved nail tech, Vinny did a fabulous job as usual on touching up my fierce talon nails. I opted for my usual black with a beige accent nail for a cool twist, and I’m beyond obsessed with the fresh new color combo. Take a look:
^^^#pronails Ahhh, I love them so much it hurts! There’s three major things that are difficult with my talon nails:
Taking my contacts in and out.
Buttoning and unbuttoning my jeans.
Opening pop cans.
Despite these minor difficulties, they are so beyond worth it. So edgy, so fierce, so fun. After a trip to the salon, I had some much needed and long overdue BFF time with my sweet Lea. My darling girl and I really wanted to be crafty today, so we went to PatCatan’s for inspiration. While ambling down the aisles we came across the wooden craft supplies and thought that it would be fun to paint birdhouses. After picking out the houses we liked and some paint, we hit up Taco Bell for a quick snack and then headed back to Lea’s place to start the craftapalooza. We were so excited about this cute project that we forgot something very important at the craft store…small paint brushes. -__- All we had in our craft supply box were big brushes from our canvas art projects, and they made painting all of the sweet details on our birdhouses totally impossible. Both of our creations turned out smudgy, smeared, and nowhere near as adorable as we wanted them to be. I straight up left my house at Lea’s place and told her to just paint it black for me. Ha, I should have just done that all along! Despite our painting difficulties, we still managed to have a blast as usual! We always do, because making fun out of a miserable crafting experience is what best friends are for! #epiccraftingfail
After a sweet best friend afternoon, I had a quick get together with my neighbor and video gaming partner in crime, Vaughn. I then proceeded to finish up some math and psych homework until my brain couldn’t take it anymore. After I had had enough of homeworking (and believe me, it didn’t take long), I ended my night with watching Saw III on Netflix. I’m a scary movie junkie, and the Saw films are one of my major guilty pleasures. After I finish up this post, I’m going to start the fourth installment of the film series and hit the hay. Maybe not the best movies to watch before bed, but that’s okay!
I hope all of you had a fabulous Thursday and an even better Friday today! What are you guys up to this weekend? Any fun plans? It’s my mom’s birthday on Sunday so my family is going to go out to eat tomorrow to celebrate – it should be fun! Tell me all about your weekend plans and leave my mama some birthday love! I wanna hear from all of you, so leave me a comment and let’s chat! Goodnight. -Sarah
I had a lovely time this evening getting crafty with my favorite little lady Miss Lea! She’s my go to crafting partner in crime and tonight we created a glitter masterpiece! Here’s the big reveal…*drum roll please*………………………..TA DAAAA! (In case you don’t know, our glitter picture is of Ohio, our home state and the heart on the picture is of our home town of Akron. #REPRESENT)
Before I give you guys the step by step on how to make this fun craft, here’s some tune-age for you to enjoy. Except you have to change the lyrics of “oh you fancy, huh?” to “oh you crafty, huh?” Instant classic.
Alright!!!! This craft is clearly pretty self explanatory, but here’s the how to guide on how to make it in case you can’t figure it out! First things first, here’s the supplies you’re going to need: (All together this craft cost about ten dollars to make)
A canvas board of your choosing. Lea and I opted for an oval shaped canvas.
Paint color of your choosing for the background.
Glitter color of your choosing for the shape you’ll be covering.
Glue
Outline of an object, animal, shape, state, continent, or whatever your heart desires to be on your canvas.
Scissors
Once all of your supplies are gathered, I’d recommend placing some newspaper down so glitter doesn’t get everywhere. You don’t want your workspace looking like Ke$ha rolled around on it.
Step 1) Paint the background of your canvas.
Step 2) Blow dry the paint to get it dry.
Step 3) Cut out the outline of whatever you’re gluing onto your canvas and glue it on.
Step 4) Cover your outlined picture with glue. For an even coat of the glue and to avoid bumpy glitter, Lea and I applied the glue with a paint brush.
Step 5) Pour the glitter color of your choosing over the freshly glued object. The glitter might not cover everything on the first try, so I would make sure that you’re glittering over a piece of paper so you can continue to pour the excess glitter from that.
Step 6) Apply a glitter heart to your glitter picture if you’d like.
And viola! You now have a super fun, quick, and easy craft. Lea and I had so much fun making this! Here’s a few pictures of us and our handy work!
If you have any fun crafting suggestions, please let me know! Lea and I would definitely love to try them out! Have you made any cool crafts or projects lately? I’d love to hear all about it, so leave me a comment and let’s chat! Have a great night! -Sarah
A few days ago I had one of the most fantastic times with my dear friend Kate. I’m sure you recall reading about her, as she’s the girl who I’m planning a trip to Europe with. She’s also my go to shopping partner!! A few weeks ago you might recall me posting about how Kate and I assembled a vintage Christmas tree together in her apartment. Unfortunately, we had no ornaments to decorate our tiny tree with, so we decided to make our own. During this fun filled evening we ate Taco Bell, drank our favorite Starbucks Peppermint Mochas, drank a bottle of wine, watched the live taping of Peter Pan that was released recently, and became the crafting queens. The night started with a trip to Patcatan’s which is a craft store, as you can guess. When we entered the store, we realized we didn’t exactly plan out what we needed very well. (The night that we assembled our tree, we had a Pinterest party to get some ideas for what ornaments to make.) So we made a quick verbal list of what we should get to at least get us started. We left the store with ornaments, black, silver, and pink glitter, a hot glue gun, black and yellow paint, paint brushes, and last but not least: googly eyes. After we finished up at Patcatans, we stopped at Giant Eagle so Kate could run in and get us a bottle of wine for the evening. A night with Miss Kate wouldn’t be complete without getting Taco Bell and Starbucks, so stops were made there as well and then we headed back to her apartment. If you take a look at my featured image, you’ll see our crafting table where all of the magic happened. Here’s a Pic Stitch collage of some of the ornaments that we made that night:
So I’m sure a lot of these ornaments are pretty self explanatory on what they are and how to make them, but here’s a little further detail on all of them:
Top left and bottom right Minion ornaments: If you’ve seen the movie Despicable Me, then you’ll know that these bulbs are supposed to be the Minions! Kate and I adore that movie, and when we saw this craft made on Pinterest, we knew that we had to give it a go. It’s as easy as it looks to make:
Step 1) Paint the ornament yellow
Step 2) Wait for the paint to dry and then paint a black band around the top of the ornament
Step 3) Wait for the black paint to dry and then hot glue the googly eyes on
Step 4) Complete your Minion by painting a little smile on it! 🙂
It’s up to you to decide whether your Minion ornament has one eye or two!!
Top right ornament: This was a really cool one that Kate made. She painted the outside of the ornament with a black paisley pattern and then she filled the bulb with red M&M’s. Super easy, super delicious.
Middle left and right ornament: At one point during our evening of crafting we both got quiet and were working intently on these ornaments for each other. When we both asked what the other was doing we each said something along the lines of “you can’t see it yet!” It turns out we were both making a name ornament for each other at the exact same time. If that isn’t best friend telepathy, then I don’t know what is!
I wrote Kate’s name with hot glue and then coated the glue in silver glitter. I then cut a red heart out of construction paper and put it inside the ornament. Viola!
Kate wrote my name in black paint and then put black glitter over top of it. She tore up red tissue paper and filled the inside of the bulb with it. Done.
Center candy cane reindeer: This is our beloved reindeer named Albert. Isn’t he the cutest?! Making this ornament is exactly how it looks like you would make it:
Step 1) Cut out antlers for the reindeer with brown foam paper and hot glue it onto the candy cane
Step 2) Cut out circles from the brown foam paper and hot glue googly eyes onto the circles. Then hot glue these onto the candy cane for the eyes
Step 3) Hot glue a red M&M onto the tip of the candy cane for the nose
Step 4) Wrap a ribbon around the neck of the candy cane and now you have your very own Albert!
Bottom left and center ornaments: These ornaments were made simply with paper and glitter.
On the bottom left ornament I drew the British flag, the German flag, and a tiny Eiffel Tower and then cut them out and stuck them in the inside of the ornament along with an ample amount of silver glitter. This little baby obviously symbolizes our European trip dream which will be happening in 2016!
The bottom center ornaments have the same “message in a bottle” idea as our dream ornament. They also have glitter….lots of glitter 🙂
So there you have it, some fun make shift crafts to get you in the holiday spirit!! Kate and I had such a blast making these. We also had an equally fun time drinking some delicious blackberry wine and enjoying Peter Pan Live. Here’s a little clip from it and if you haven’t seen the full movie, I can’t recommend it enough!!
Do you have any fun last minute holiday crafts to recommend? Did you make a seasonal craft that you were particularly proud of? I want to hear all about it, so leave me a comment and let’s chat! Happy Monday! -Sarah
PS: My brother is home for the holidays!!!!!!!!!!!!!!!!!!!!! HURRAY!!!!!!!!!!! Lil Red is a happy camper :))))
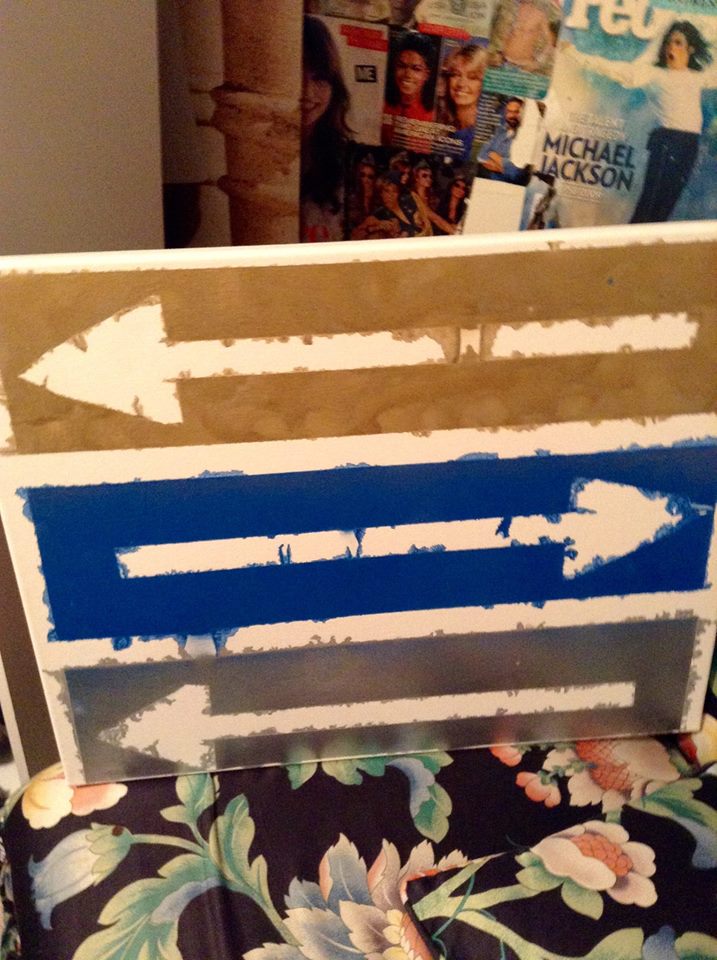
So as you guys know, I LOVE me a good craft – specifically canvas art! My best friend Lea and I just completed a super fun, cute, and easy craft that I thought I would share! Take a look:
What you’ll need:
Canvas board
Spray paint in multiple colors
Durable tape that you can spray paint over
How we did it:
As I mentioned above, this craft was easy peasy lemon squeezey. But here’s my step by step guide, just in case you can’t figure it out by yourself! 😉
Step one: On your canvas place your tape in any location and pattern of your choosing. I kept my design fairly simple, while Lea incorporated the wore “Smile” onto hers. You have my permission to go crazy with your canvas taping until you reach your desired pattern. Not gonna lie, it took Lea and I a LONG ass time to lay out our pattern because we’re both such perfectionists. If she wasn’t there making me laugh the entire time, I would have gotten up and left. Mama was getting frustrated!!! (Leave it to me to not be able to make a triangle made out of tape for my arrows. #fml)
Step two: Take your newly taped canvas outside along with the spray paint colors that you picked out. The colors that were used by Lea and I were purchased with the intent to make another craft that didn’t turn out too hot. Since we’re ballin on a budget we figured we could just use the same colors for this new craft and it ended up looking great! The metallic silver and gold along with the blue complimented each other a lot better than I thought. Anywho, once you have your color scheme figured out, go ahead and spray paint to your hearts content. Fair warning that some of the paint will more than likely leak through the tape. But fear not – because in my opinion the dripping paint gives the canvas character! Rub some dirt on it and it will be fine…or whatever.
Step three: Leave your canvas outside or in a well ventilated room to dry. (Spoiler alert – the spray paint smells like butt!) Once your canvas is dry, you can remove your tape and reveal your masterpiece!!!
So there you have it, a quick and easy craft that cost a little over ten dollars to make. Not bad for some super cute new wall art! If anyone has some fun holiday craft suggestions pleeeease let me know! And if you for some reason have any questions on this project, leave me a comment and let’s chat. Have a great night! -Sarah
Earlier this week I mentioned to my parents that I would like to start a map tracker of where all of my lovely blog readers are located around the world. My dad promptly went down into our scary basement and returned with a huge map of the world. I finished all of my homework super early today (pat on the back for me!) so I thought tonight would be a great time to get to work on my project, and here’s the final result: (All of the European countries are basically stacked onto each other because my post it notes were too big! Sorry! But I can assure all of you that I labeled every single country that I have a reader from with care 🙂 )
This evening I printed out my list of countries that have viewed http://www.lifewithlilred.com, laid my map out onto the hallway, and got to work. It was SO fun labeling all of the different locations, because it was like a scavenger hunt to find all of the home lands while the map text was in such a small print! I almost needed a magnifying glass for some of the itty bitty ones! It made it even better that my dad helped me find all of the places that I had trouble locating. I was honestly blown away by how knowledgeable my dad was about geography. There were so many times this evening when I would holler “DAD! Where is (insert country name here)?!” and without thinking my dad could give me an exact location of what I needed. My father loved traveling back in the day. He’s been all over Europe and lived in Thailand for about a year when he served in the Navy. Remembering these things about my old man made me appreciate our time together making this project even more. I felt like he enjoyed it just as much as I did, and that was really special to me. Every day my dad makes it a point to ask me where I have readers from, and it really touches my heart. The fact that he shows interest in my blogging which I enjoy so much really means a lot to me. Unplanned daddy daughter time tonight was a definite success!
I want to thank everyone who takes the time out of their day to read my blog. Please consider my mapping project tonight as a tiny gift from me to you. I thought about all of you guys when I was labeling my map. What you were up to, what the weather was like, what time of day is it in your home land. When I was working on this map, it was a weirdly warm October night. The sky in Akron, Ohio gets dark so quickly now so it looked like it was way later into the evening than just seven o’clock. I thought about the sun setting and rising in different areas of the world, and I felt so connected with all of you, and it was really amazing. Every day I look forward to reading all of your fantastic thoughts in your articles, and I hope the feeling is just as mutual for mine! Have a lovely Tuesday night, and know that someone in A-k-Rowdy, Ohio is sending some good vibes your way.
As a friendly reminder, it’s Hump Day tomorrow and you know what that means…AMERICAN HORROR STORY!!!!!!! It’s one of my favorite things in the world to write my weekly episode reviews, so make sure you check back in with me tomorrow for my thoughts on episode four! Goodnight! -Sarah
So as all of you know, I LOVE crafting with my friends. I was looking for some quick and easy crafts to make on our next hang outs together and found quite a few that I like a lot. I’ve been really drawn to the candle holder crafts lately. I think they add such a neat and unique touch to any room. Not only are they great decor, but they make awesome gifts too. I wanted to share all of these cool new crafts I plan on trying with you guys. If there’s any crafts that you’ve completed recently that you think are awesome, please share them with me!
I’m really looking forward to making the candle holders with the haunted house and bat stencils. They look so cool! Hopefully mine turn out just as well. I also really like the canvas art that’s set as my featured image. As you all know, I love me a good canvas art, as you can see by my previous crafting posts 😉 The little acorn owls are seriously the cutest things ever. I feel like this would be an awesome craft to make with little ones during your fall family gatherings this year. So precious!
What crafts are you guys currently working on? If you’ve made anything similar to the pictures I posted, PLEASE show me! I’d love to see it! Wish me luck on my fall crafting adventures! -Sarah
I had a lovely time hanging out with one of my dear friends Tyler today. One of our favorite things to do when we hang out is indulge in a bottle of wine and get nice and crafty! Here’s the results and the how to’s of our fall inspired creation today!
All that’s needed for this craft is:
mason jar
acorns
rope
candle holder
candle
Here are the steps for making this cute little craft, even though it’s pretty self explanatory!
Acquire acorns! Go to your nearest hiking trail or even your backyard and turn into a human squirrel and collect as many acorns as needed to semi fill your mason jar.
Place the candle holder with candle into said mason jar. Tyler and I purchased a taller candle holder and a tea light candle, and the acorns fit very nicely around them.
Fill your jar with as little or as many acorns as you’d like. I’d recommend filling it a little more than halfway so you get a nice effect from the candle light peeking out of all the nooks and crannies of the acorns piled on each other.
Tie the rope around the top of the jar for the final touch.
Light your candle, dim the lights, and enjoy your new fall themed candle jar!
And there you have it! Simple as that. A ten minute craft gave Tyler and myself a fun new autumn decoration! If you guys have any quick and easy fall crafts, let me know! Have a great night! -Sarah